Advanced techniques in Midjourney
Create consistent and refined visuals using Midjourney’s advanced techniques.
2024-12-09
Welcome to part 4 of our Create stunning images with Midjourney course.
In our previous lessons, we've covered the basics of prompt crafting and explored some fundamental techniques. Now, it's time to take your skills to the next level with advanced image generation techniques that can truly elevate your business visuals.
As entrepreneurs and business professionals, you know that standing out in a crowded market is crucial. Whether you're designing product packaging, creating marketing materials, or developing a brand identity, these advanced Midjourney techniques will help you create unique, eye-catching visuals that capture your audience's attention.
In this lesson, we'll dive deep into:
- Leveraging image prompts and references
- Image blending techniques
- Inpainting and outpainting with Vary Region
- Upscaling methods and image enhancement
- Utilizing seed values for consistent results
Let's get to it.
Leveraging image prompts
Image prompts and references are powerful tools that allow you to guide Midjourney's output based on existing images. This technique is particularly useful when you want to maintain brand consistency or draw inspiration from specific visual elements.
Let's say you're a packaging designer working on a new line of organic teas. You want to create a series of illustrations for the packaging that blend traditional tea imagery with a modern, organic feel.
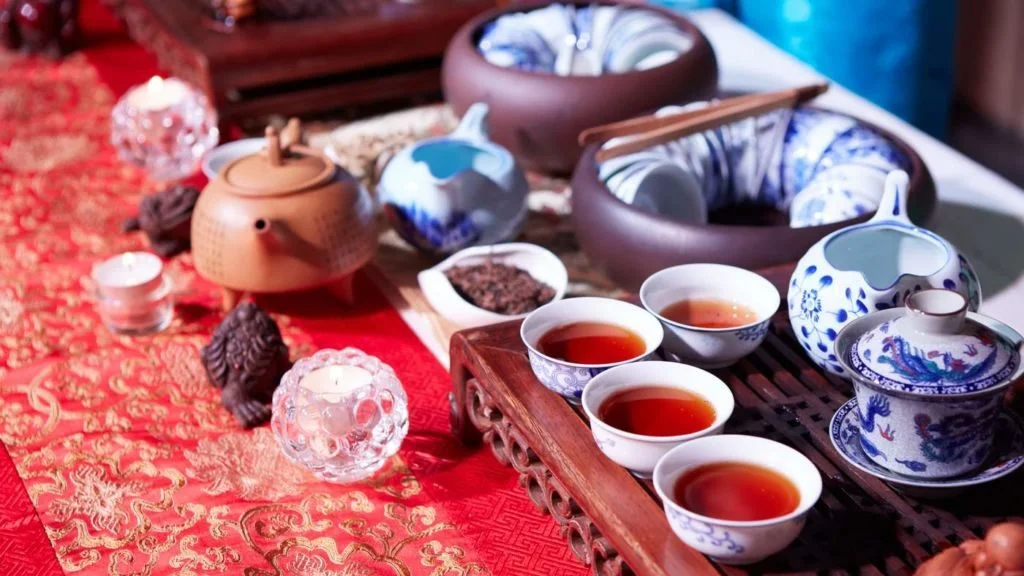
First, let's find a reference image that captures the essence of what we're looking for. For this example, I've chosen an image representing a traditional Chinese tea ceremony.
To use an image prompt on the Midjourney web interface:
Click on the "Image" icon in the prompt box at the top of the page.

Upload your reference image or drag and drop it into the designated area.
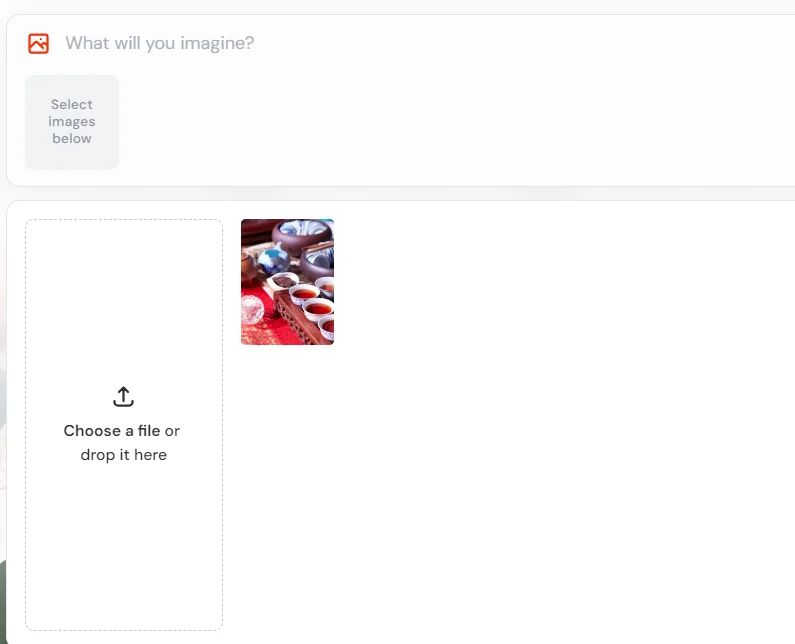
Once uploaded, you'll see a thumbnail of your image below the prompt box.
Now, let's craft our prompt:
Create an illustration for organic tea packaging inspired by this image, incorporating modern, minimalist elements. Use a soft, earthy color palette with shades of green and brown. Add subtle leaf patterns in the background. --ar 3:4
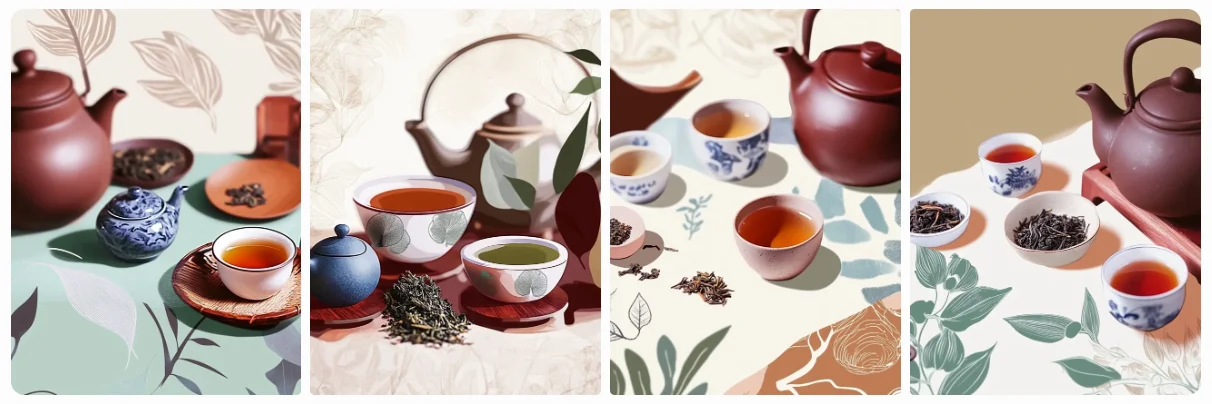
As you can see, Midjourney has incorporated elements from our reference image while adding the modern and organic touches we specified. This approach allows you to blend traditional imagery with a fresh, contemporary twist that resonates with today’s health-conscious consumers.
Now, here’s where the real value comes in for your packaging design project. This AI-generated illustration is an excellent starting point. You can download it, import it into Canva or Photoshop, and then refine it—adjusting colors to match your brand, or using it as a background.
You can overlay your product name, add nutritional information, and incorporate other required elements. The advantage here is that you’re not starting from scratch; you have a unique illustration that captures your brand’s essence, ready to be customized for your product line.
For those using Discord, you can achieve the same result by uploading your image and using its URL in your prompt, like this:
[Image URL] Create an illustration for organic tea packaging inspired by this image, incorporating modern, minimalist elements. Use a soft, earthy color palette with shades of green and brown. Add subtle leaf patterns in the background. --ar 3:4
Mastering style and character references
Now let's dive into one of Midjourney's most powerful features for creating consistent and visually cohesive images. If you've ever wanted to generate a series of images that keep the same style or feature the same character across different scenes, Midjourney provides elegant solutions with its style and character reference tools.
In our last part, we explored image prompts, which are great for influencing composition and subject matter. However, style references (--sref) and character references (--cref) take this concept further, offering more precise control over the aesthetic and character consistency in your generated images.
Let's break this down into two parts: style references and character references.
Part 1: Style References (--sref)
Style references allow you to maintain a consistent visual style across multiple images, which is crucial for brand identity, marketing campaigns, and cohesive storytelling.
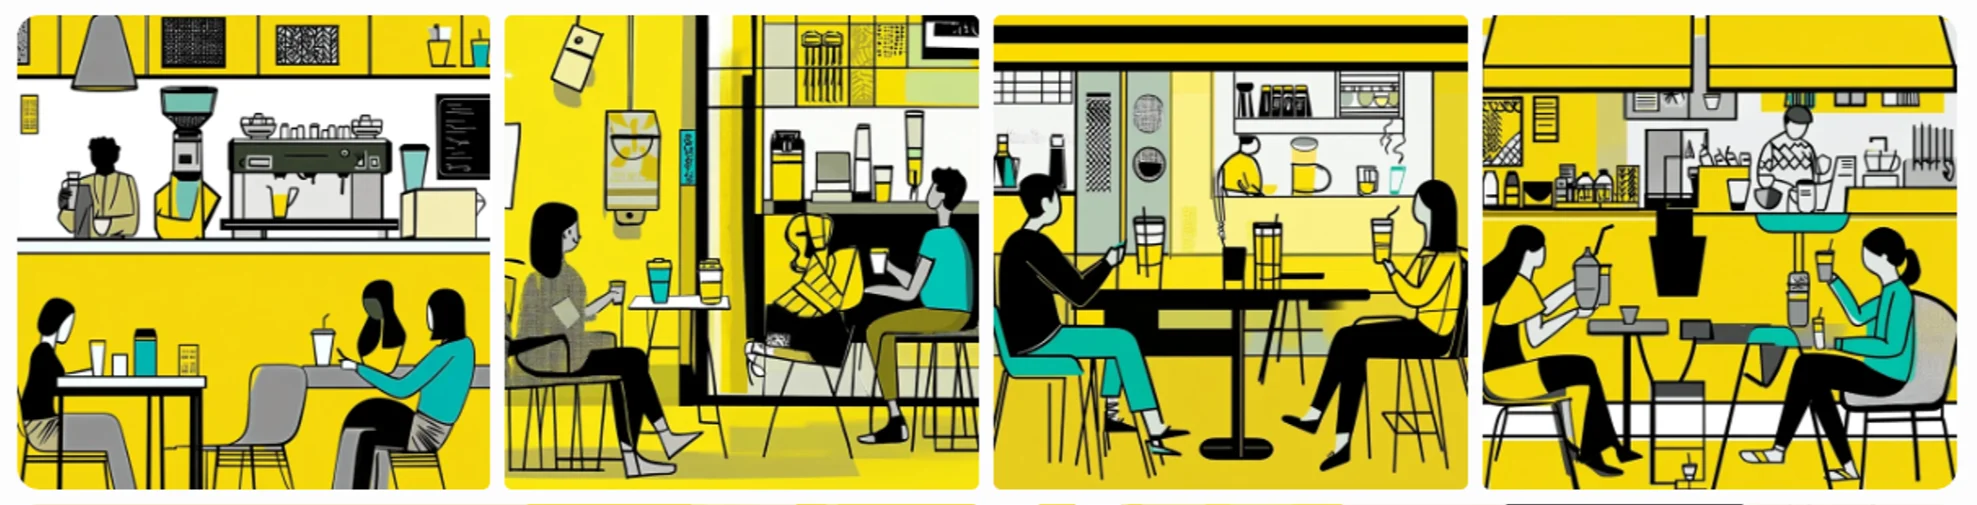
Let's say you're a graphic designer tasked with creating a series of illustrations for a trendy coffee shop's social media campaign. You want to maintain a consistent, modern aesthetic across all your designs.
On the Midjourney web interface, click the "Image" icon in the prompt box. Upload your style reference image or drag it into the prompt area. Hover over the image thumbnail and select the middle icon (paper clip) to set it as a style reference.
In the prompt box, describe the scene you want to create:
A cozy outdoor seating area of a modern coffee shop, with stylized customers enjoying beverages. Include geometric patterns, bold lines, and a vibrant color palette dominated by yellow, black, and teal.
Now, let's explore using pre-defined style references from curated collections. These can be incredibly useful when you're looking for a specific aesthetic but don't have a reference image of your own.
Some excellent resources for style references include:
You can try using a style reference from one of these collections:
- Visit one of the style reference websites and choose a style you like.
- Copy the style reference code or URL.
- In the Midjourney prompt box, use the following format:
[Your main prompt about the subject] --sref [paste your style reference code/URL here]
This approach allows you to quickly experiment with various styles without needing to create or find specific reference images yourself.
Part 2: Character References (--cref)
Character references are invaluable when you need to maintain consistent character appearances across different scenes or compositions. This is particularly useful for creating a series of advertisements featuring a brand ambassador or developing story-based content.
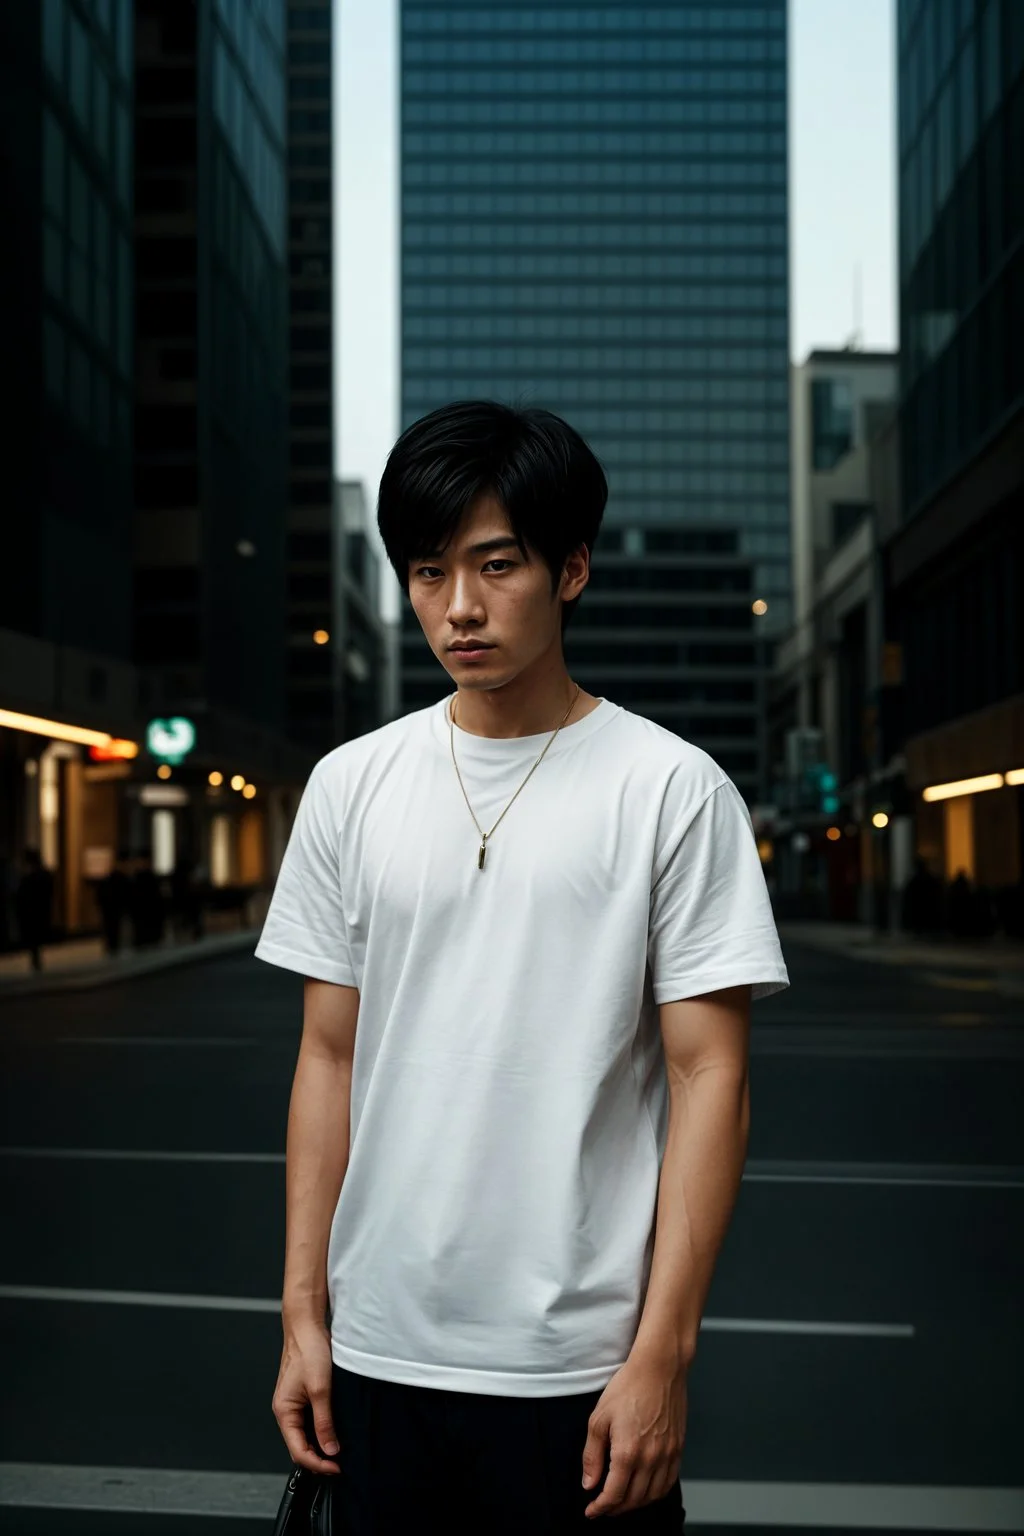
Let's say you're working on a fashion campaign for a minimalist clothing brand, and you want to feature a consistent model across various promotional materials. The provided image serves as an excellent character reference.
In the web interface, generate or select an image of your ideal brand ambassador. Upload this image and set it as a character reference (person icon on hover).
In your prompt, describe a new scene featuring your character:
A young Asian man with short black hair modelling a white t-shirt against a backdrop of sleek, modern architecture. The scene should have a twilight urban atmosphere with warm street lights. The man is looking directly at the camera with a confident expression. His pose should showcase the t-shirt's fit and style.
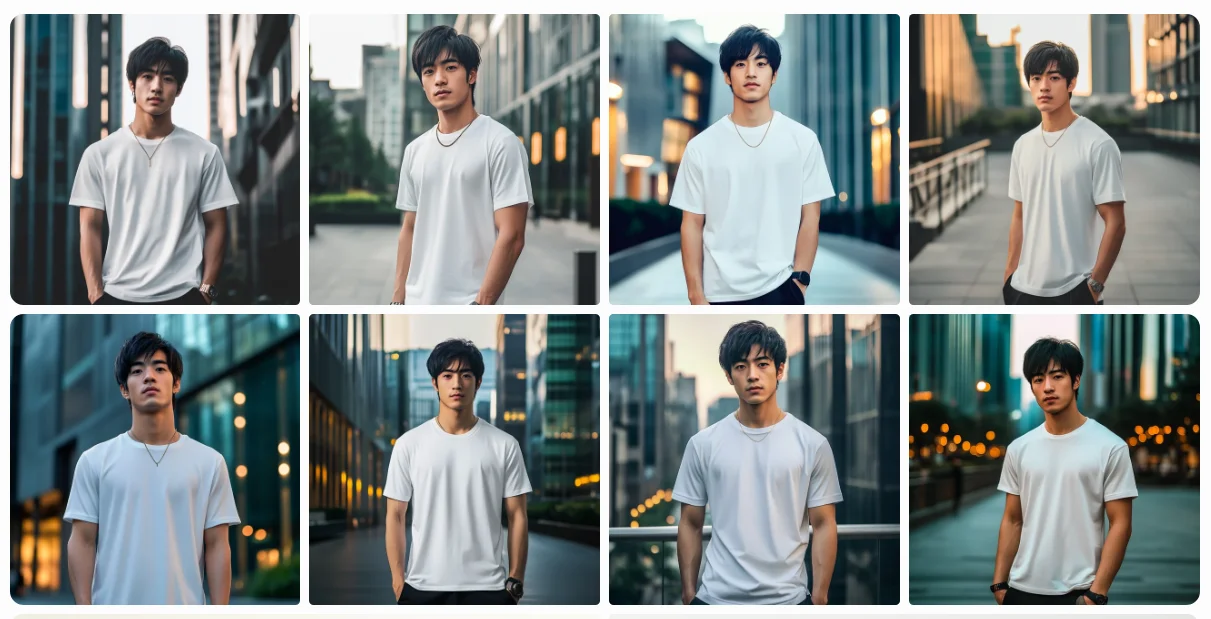
The generated image should feature your brand ambassador with consistent facial features, but in the new scene you've described.
For Discord users, the process is similar for both style and character references. Simply paste the image URL or style reference code after --sref or --cref in your prompt, like this:
/imagine prompt: [Your prompt] --sref [style image URL or code]
or
/imagine prompt: [Your prompt] --cref [character image URL]
With references, you can create visually cohesive campaigns, maintain character consistency across different marketing materials, and streamline your creative workflow. Remember, while these tools are powerful, they may not always produce perfect results. Don't be afraid to experiment with different prompts, reference images, and parameter values to achieve your desired outcome.
Image blending techniques
Image blending is a powerful technique that allows you to combine different visual elements to create unique compositions. In this example, we'll use it to design custom illustrations that perfectly match your brand palette.
Let's say you're a marketing director for a tech startup, and you want to create a series of illustrations for your website and marketing materials that align with your brand's visual identity.
To begin, you'll need two things:
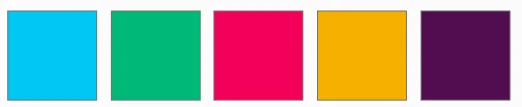
- An image of your brand's color palette
- A reference illustration similar to the style you're aiming for
On the Midjourney web interface:
Click the "Image” icon next to the prompt box. Upload your brand palette image and your reference illustration.

Now, let's craft our prompt using a template that you can adapt for your specific needs:
Blend these images to create a [style] illustration of [subject] in a [setting], using bold and vibrant colors that match the brand palette of [list your brand colors], with [design elements], Emphasize [key elements or feelings].
Here's an example of how you might fill in this template:
Blend these images to create a vibrant, modern flat-style illustration of a woman coding on a laptop in a sleek tech workspace, using bold and vivid colors that match the brand palette of cyan, green, magenta, yellow, and deep purple, with clean lines and minimalistic design elements, illuminated by soft ambient light. Emphasize creativity and innovation.
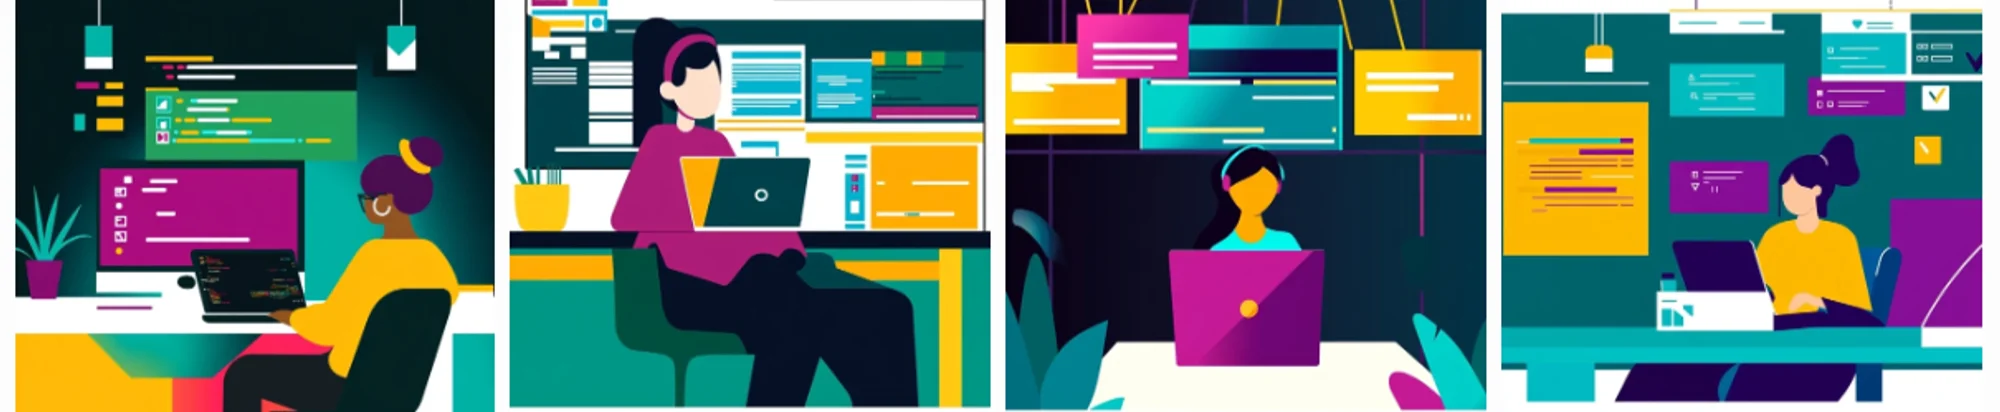
This approach helps you create visually appealing illustrations that align perfectly with your brand identity. The blending technique ensures accurate color representation, while the reference illustration guides style and composition.
You can adjust prompts to highlight different brand aspects or create various scenes, such as team collaboration or product demonstrations while maintaining a consistent style.
Inpainting and outpainting
Inpainting and outpainting are techniques that allow you to modify specific parts of an image or extend it beyond its original boundaries. These methods are particularly useful for refining designs, adding new elements to existing compositions, or expanding scenes for different formats. Midjourney has streamlined these processes in their new web editor interface, combining features like Vary Region, Pan, and Zoom into one unified tool.
Let's explore how to use these features effectively. We'll use the scenario of an interior designer who has created a visualization of a modern living room and wants to add a statement art piece to the wall, and then expand the room to include a connected kitchen.
To access the editor on the Midjourney web interface, generate your base image of the living room.
Click on the image to open it in the lightbox view. Click the "Editor" button in the bottom right corner to open the new interface.
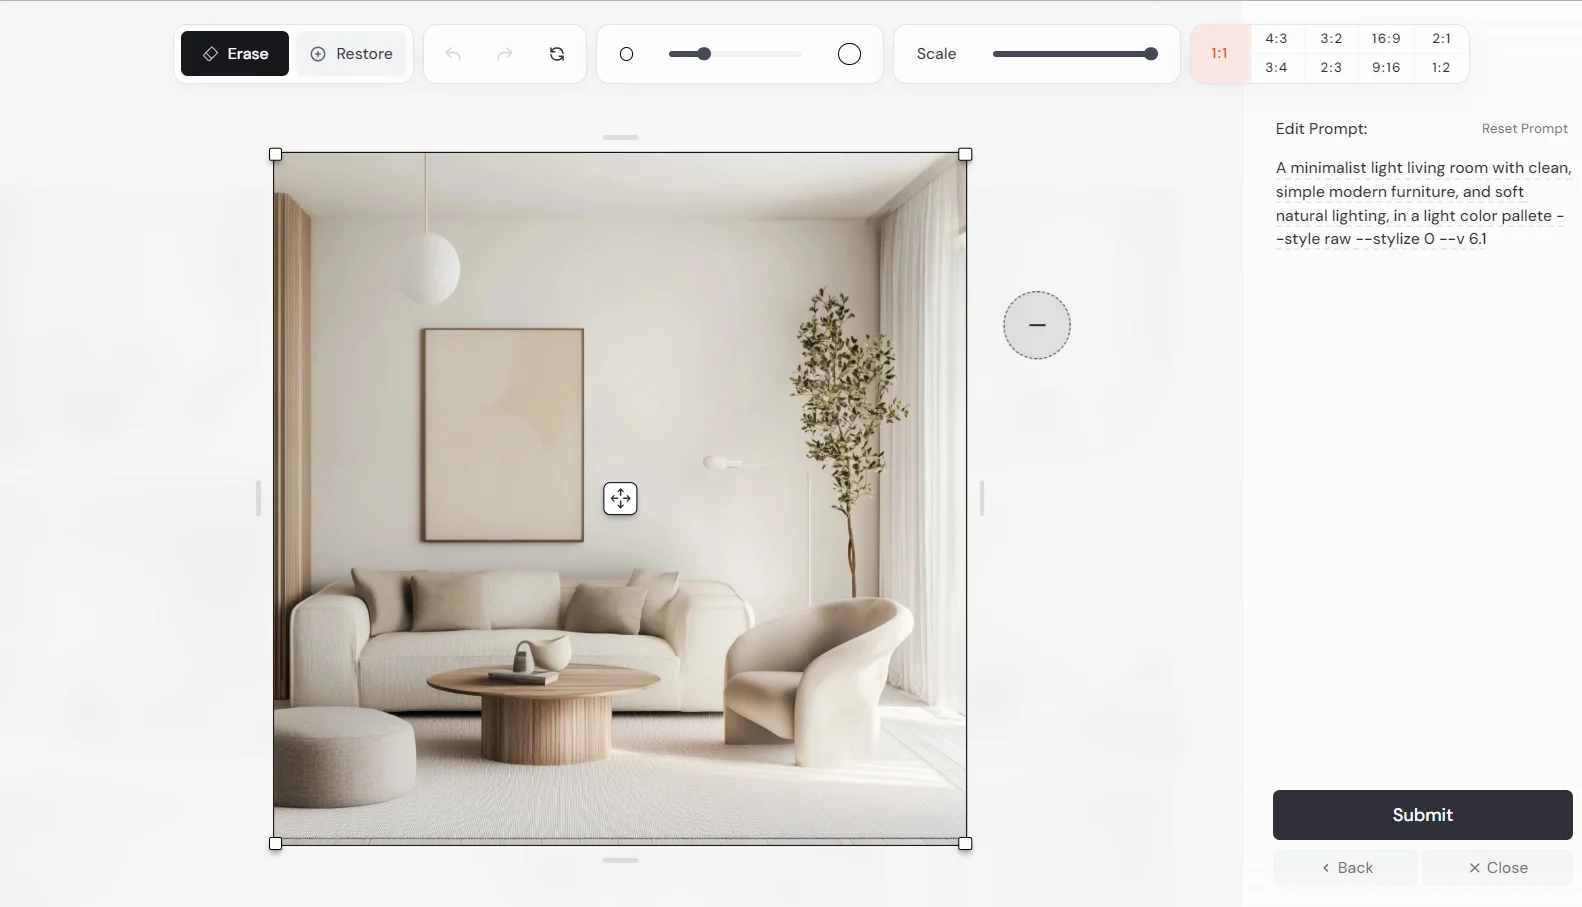
Now, let's walk through the inpainting process. In the editor, select the "Erase" tool (default).
Adjust the brush size using the slider at the top, if needed.
Use the brush to select the area of the wall where you want to add the artwork. Remember to select some extra space around this area for better results.
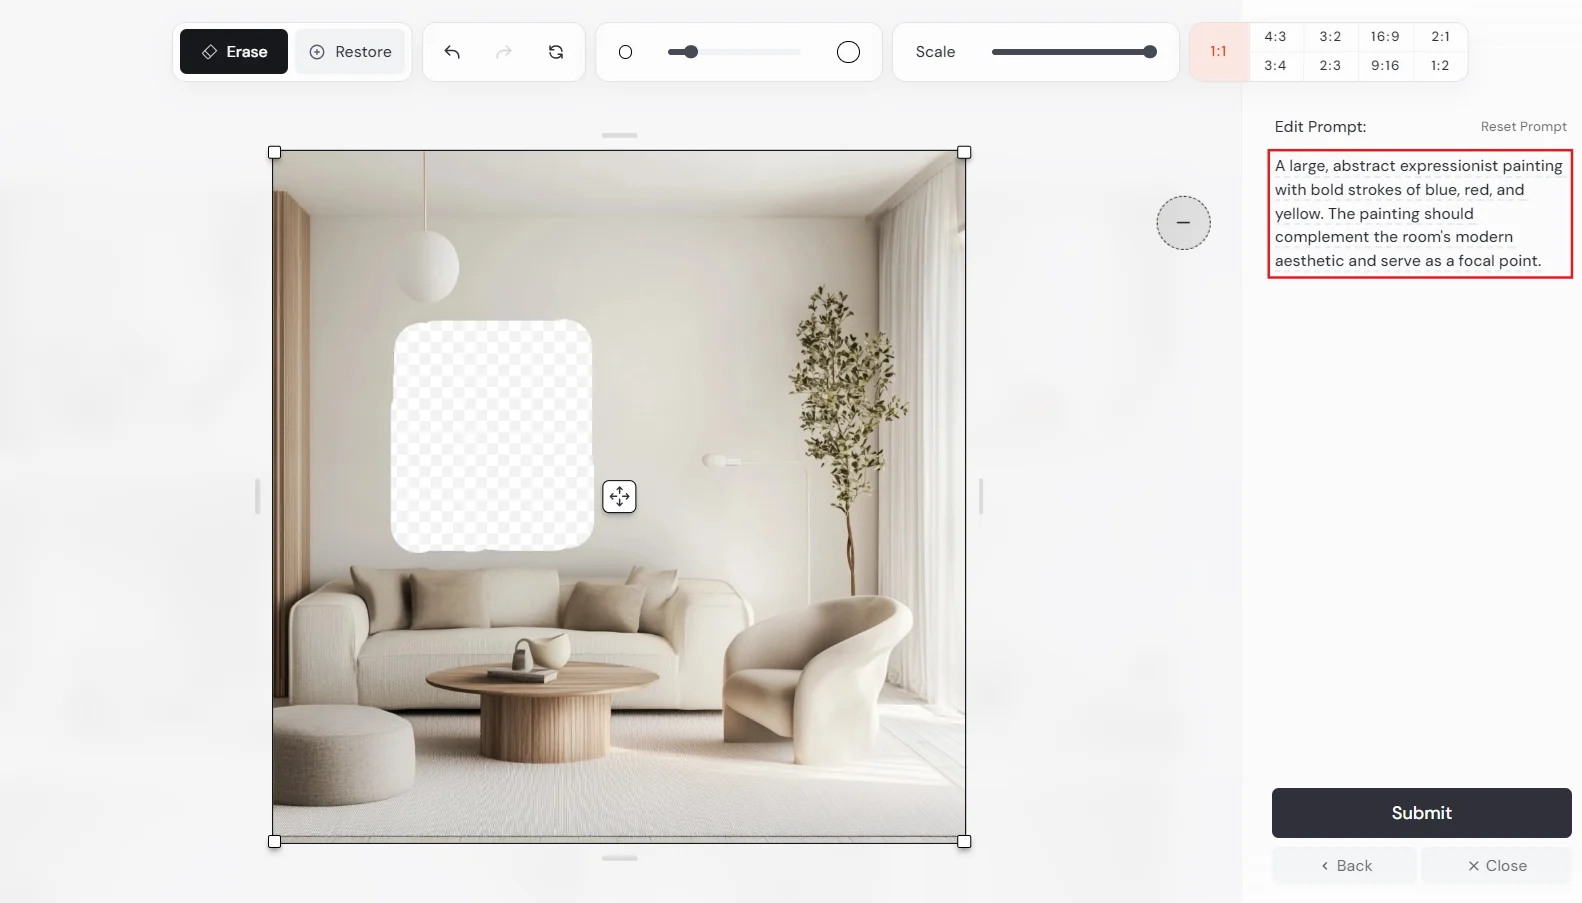
In the "Edit Prompt" box, describe the artwork you want to add:
A large, abstract expressionist painting with bold strokes of blue, red, and yellow. The painting should complement the room's modern aesthetic and serve as a focal point.
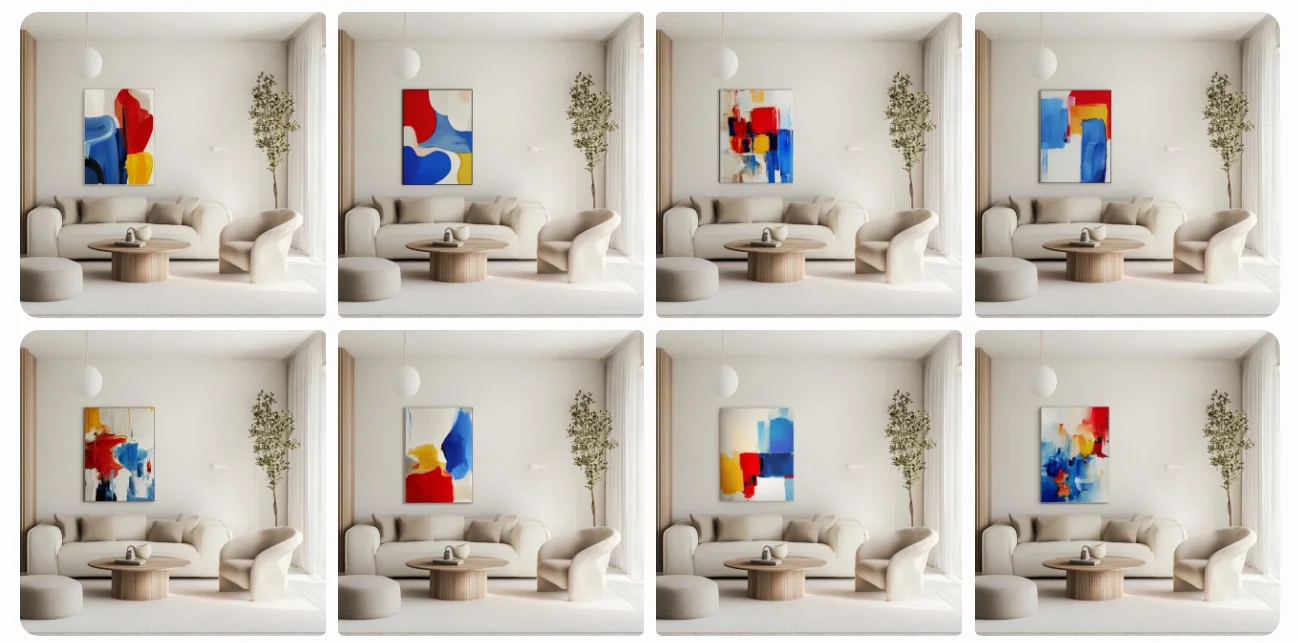
The result should show your original room design with the new artwork seamlessly integrated into the selected area. This technique allows you to make precise adjustments to your designs without having to regenerate the entire image.
Now that we have our living room with the new artwork, let's expand it to include a kitchen:
Select your preferred design from the generated images. Click on the image to open it in the lightbox view, then click the "Editor" button again.
Use the "Scale" slider to expand your image, focusing on the left side where we'll add the kitchen.
Click and drag the reposition icon in the center of your image to adjust the original living room's position within the new expanded canvas.
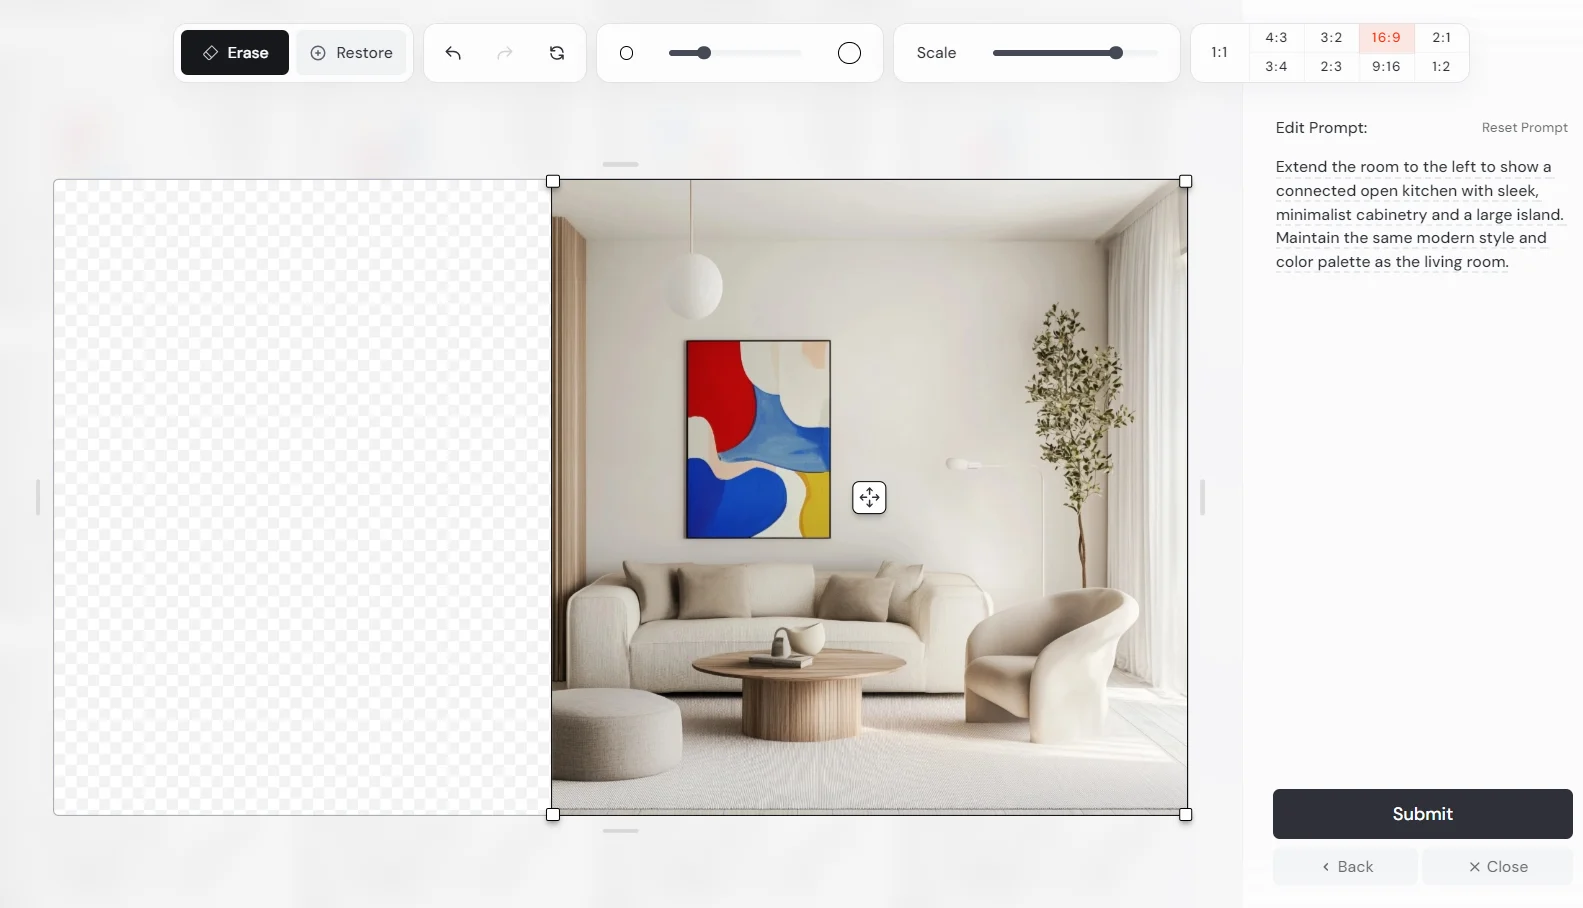
Update your prompt to describe the new kitchen area:
Extend the room to the left to show a connected open kitchen with sleek, minimalist cabinetry and a large island. Maintain the same modern style and color palette as the living room.
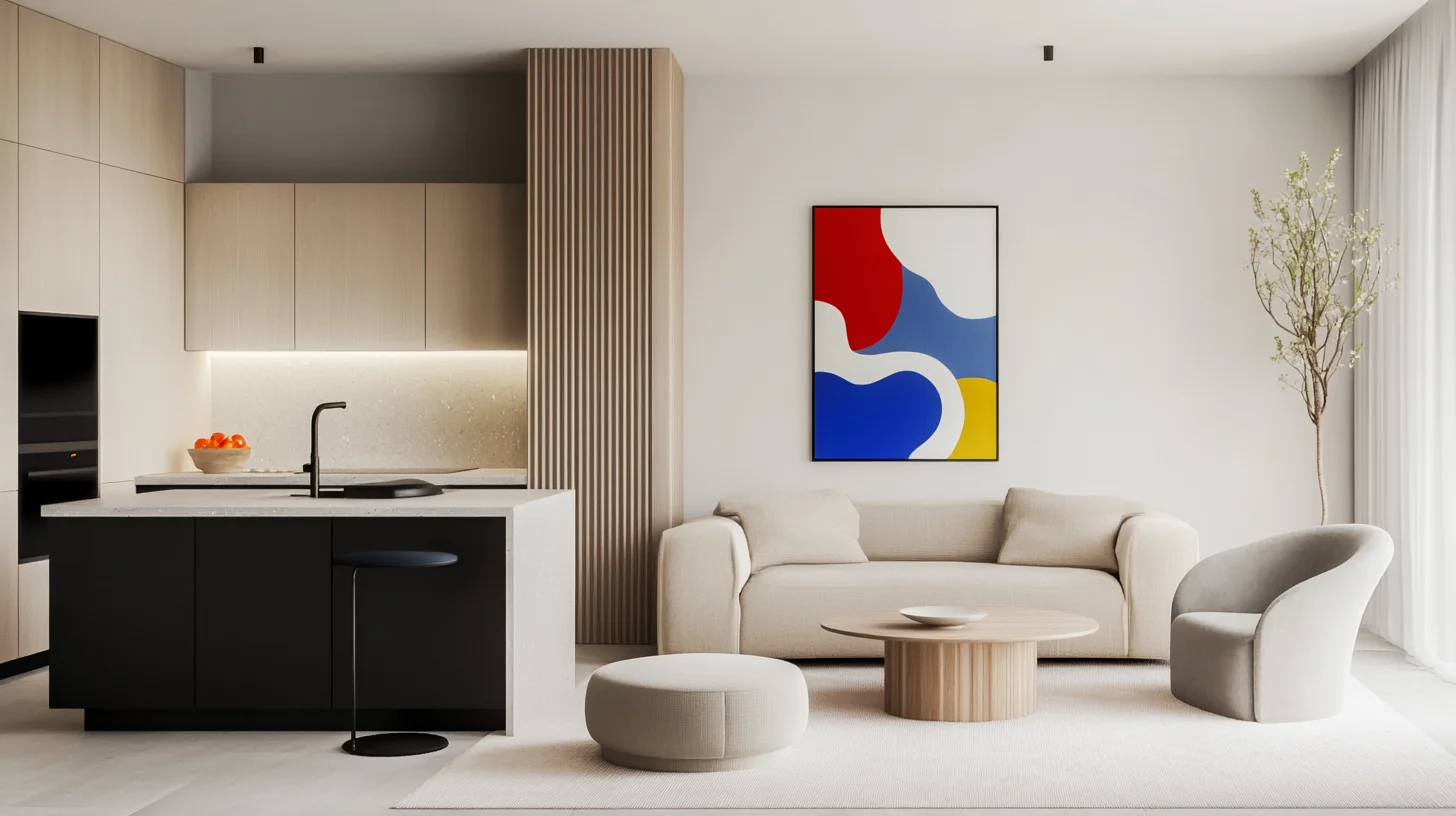
The result should show your chosen living room design with the artwork, now extended to include the new kitchen space. This step-by-step approach allows you to refine each element of your design separately, ensuring that each addition meets your exact specifications.
Exercise: Put your skills to test
As a marketing consultant for a tech startup, your challenge is to create a series of illustrations for a new AI-powered productivity app called "FlowMind." These illustrations will be used across various marketing materials and within the app itself.
Requirements:
- Use image blending techniques to incorporate the app's color palette (blue, green, and purple) into your designs.
- Implement style references (--sref) to maintain a consistent, modern aesthetic across all illustrations.
- Utilize inpainting and outpainting techniques to refine and expand your designs as needed.
- Create a set of four interconnected illustrations that tell a story of increased productivity and mental clarity.
Steps:
- Design a base illustration representing the concept of "mental flow" using the app's color palette.
- Create three additional illustrations showcasing different features of the app (e.g., task management, focus timer, analytics).
- Use inpainting to add or modify specific elements within each illustration to enhance the storytelling.
- Apply outpainting to expand one of the illustrations into a wider banner format for website use.
Share your work! Post your series of FlowMind illustrations, including the expanded banner version, in the "share-your-work" channel on the Ben's Bites Slack community.
In our next lesson, we'll look at some advanced workflows and specialized features to take your Midjourney skills to the next level. Keep your creative engines running, and we'll see you in the next part of our Midjourney mastery journey!
This tutorial was created by Tanmay.