Build an automated patient feedback system
Create an AI-powered workflow that collects, analyzes, and summarizes feedback after your meetings and appointments.
2025-01-10
Getting feedback from clients after meetings is important. However, many professionals simply don’t have the time or resources to follow up with each customer individually. This can lead to missing valuable information that could help improve services.
This tutorial shows you how to automate the entire feedback process. We'll create a system that automatically collects feedback after your meetings, understands if clients are happy or unhappy, and alerts you about any urgent issues—all working by itself in the background.
The calendar-integrated system works for any meeting type, from patient appointments to client meetings to workshops, making feedback collection effortless.
You’ll learn how to:
- Automate post-meeting feedback requests
- Implement AI-powered response analysis
- Create a feedback tracking system
- Set up priority alerts for urgent responses
- Generate automated summary reports
You'll need:
- Lindy account (free tier available)
- Google Calendar set up for your events
Let’s dive in!
Step 1: Create your workflow
Let's start by setting up the basic structure that will trigger our feedback system after each meeting and event.
First, head to Lindy.ai and create an account if you haven't already.
While Lindy offers various automation capabilities, we'll be using it specifically for its AI-powered workflow abilities that can understand and process natural language conditions.
Once logged in, click "New Lindy" to start a fresh workflow, and select Start from scratch.
Now, our first step is creating the trigger that initiates our feedback collection process.
Click the "+" button and select "Google Calendar" as your trigger source.

Choose "Calendar Event Ended" as the specific trigger type. When prompted, connect your Google Calendar account with the required permissions—this allows Lindy to detect when appointments finish.
To make our workflow more efficient, let's add a filter condition. In the ‘Restrict by attendee type’ dropdown, select "Only events with at least one external attendee." This ensures we're only collecting feedback from actual patient appointments, not internal meetings or personal reminders.
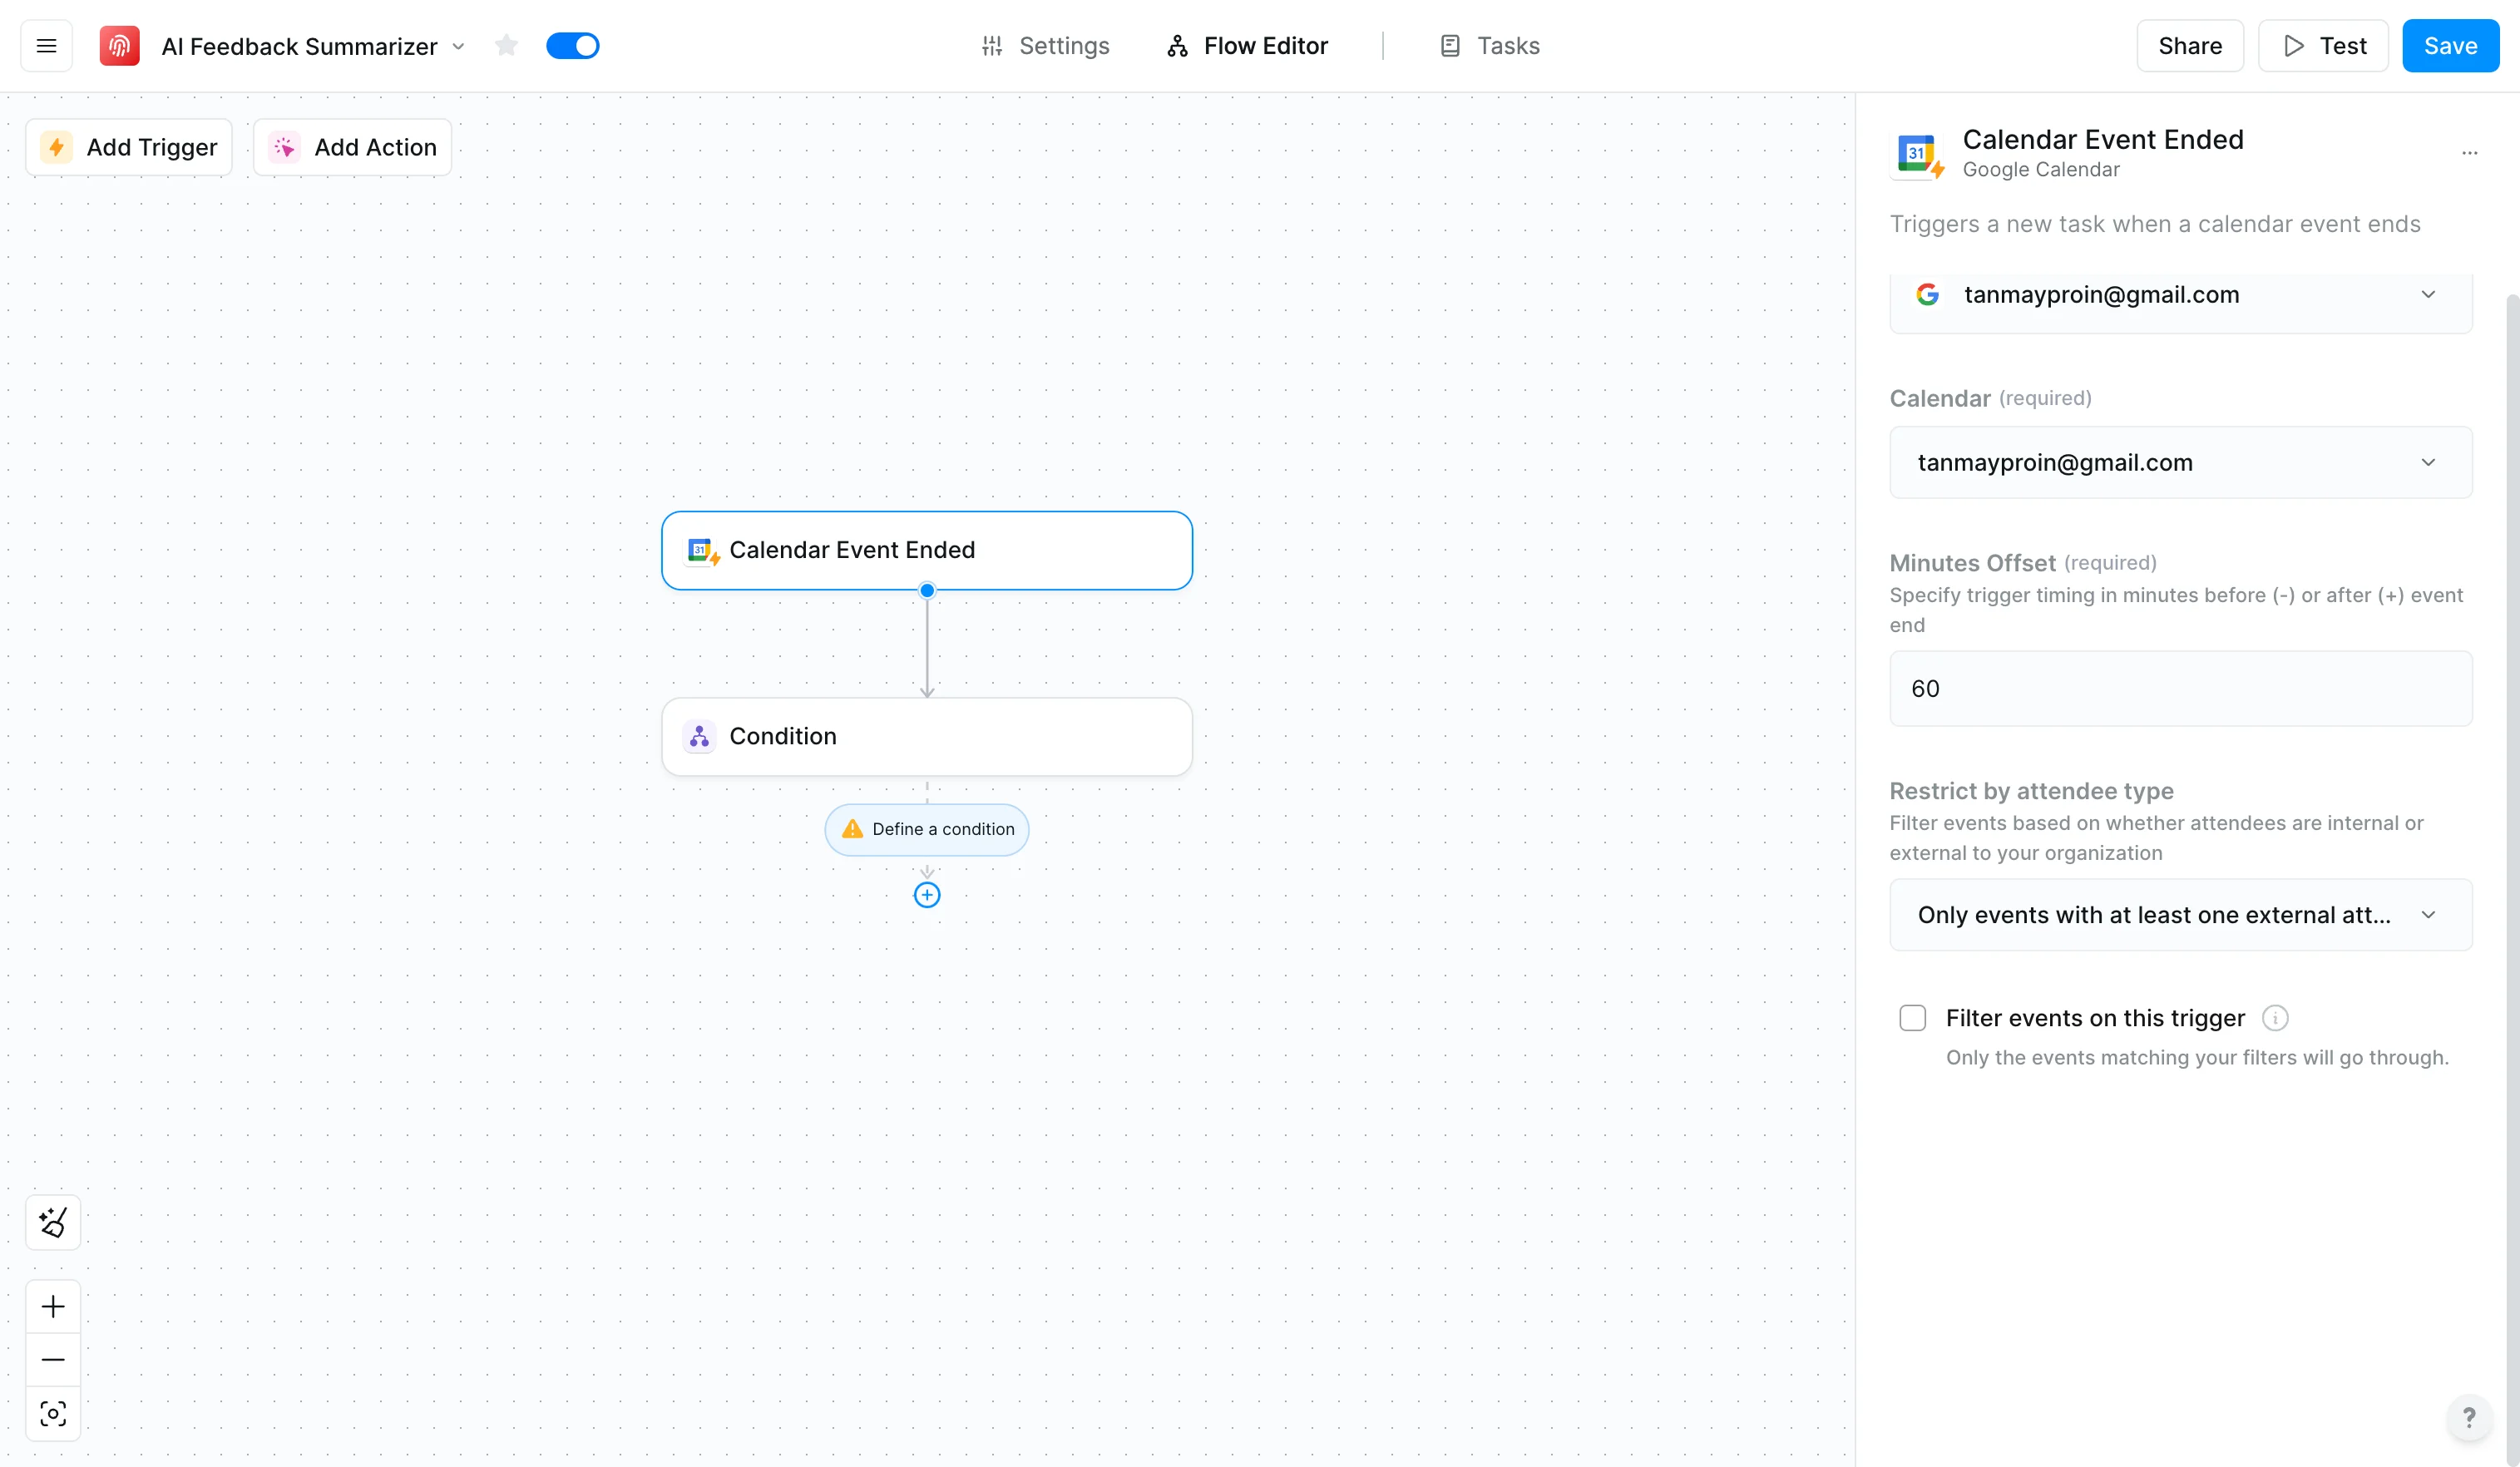
Set the minutes offset in the Google Calendar trigger, specifying how much time before or after you want the workflow to be triggered relative to the event.
Step 2: Design your feedback collection process
Now that we have our trigger set up, let's create the mechanism that requests and receives feedback.
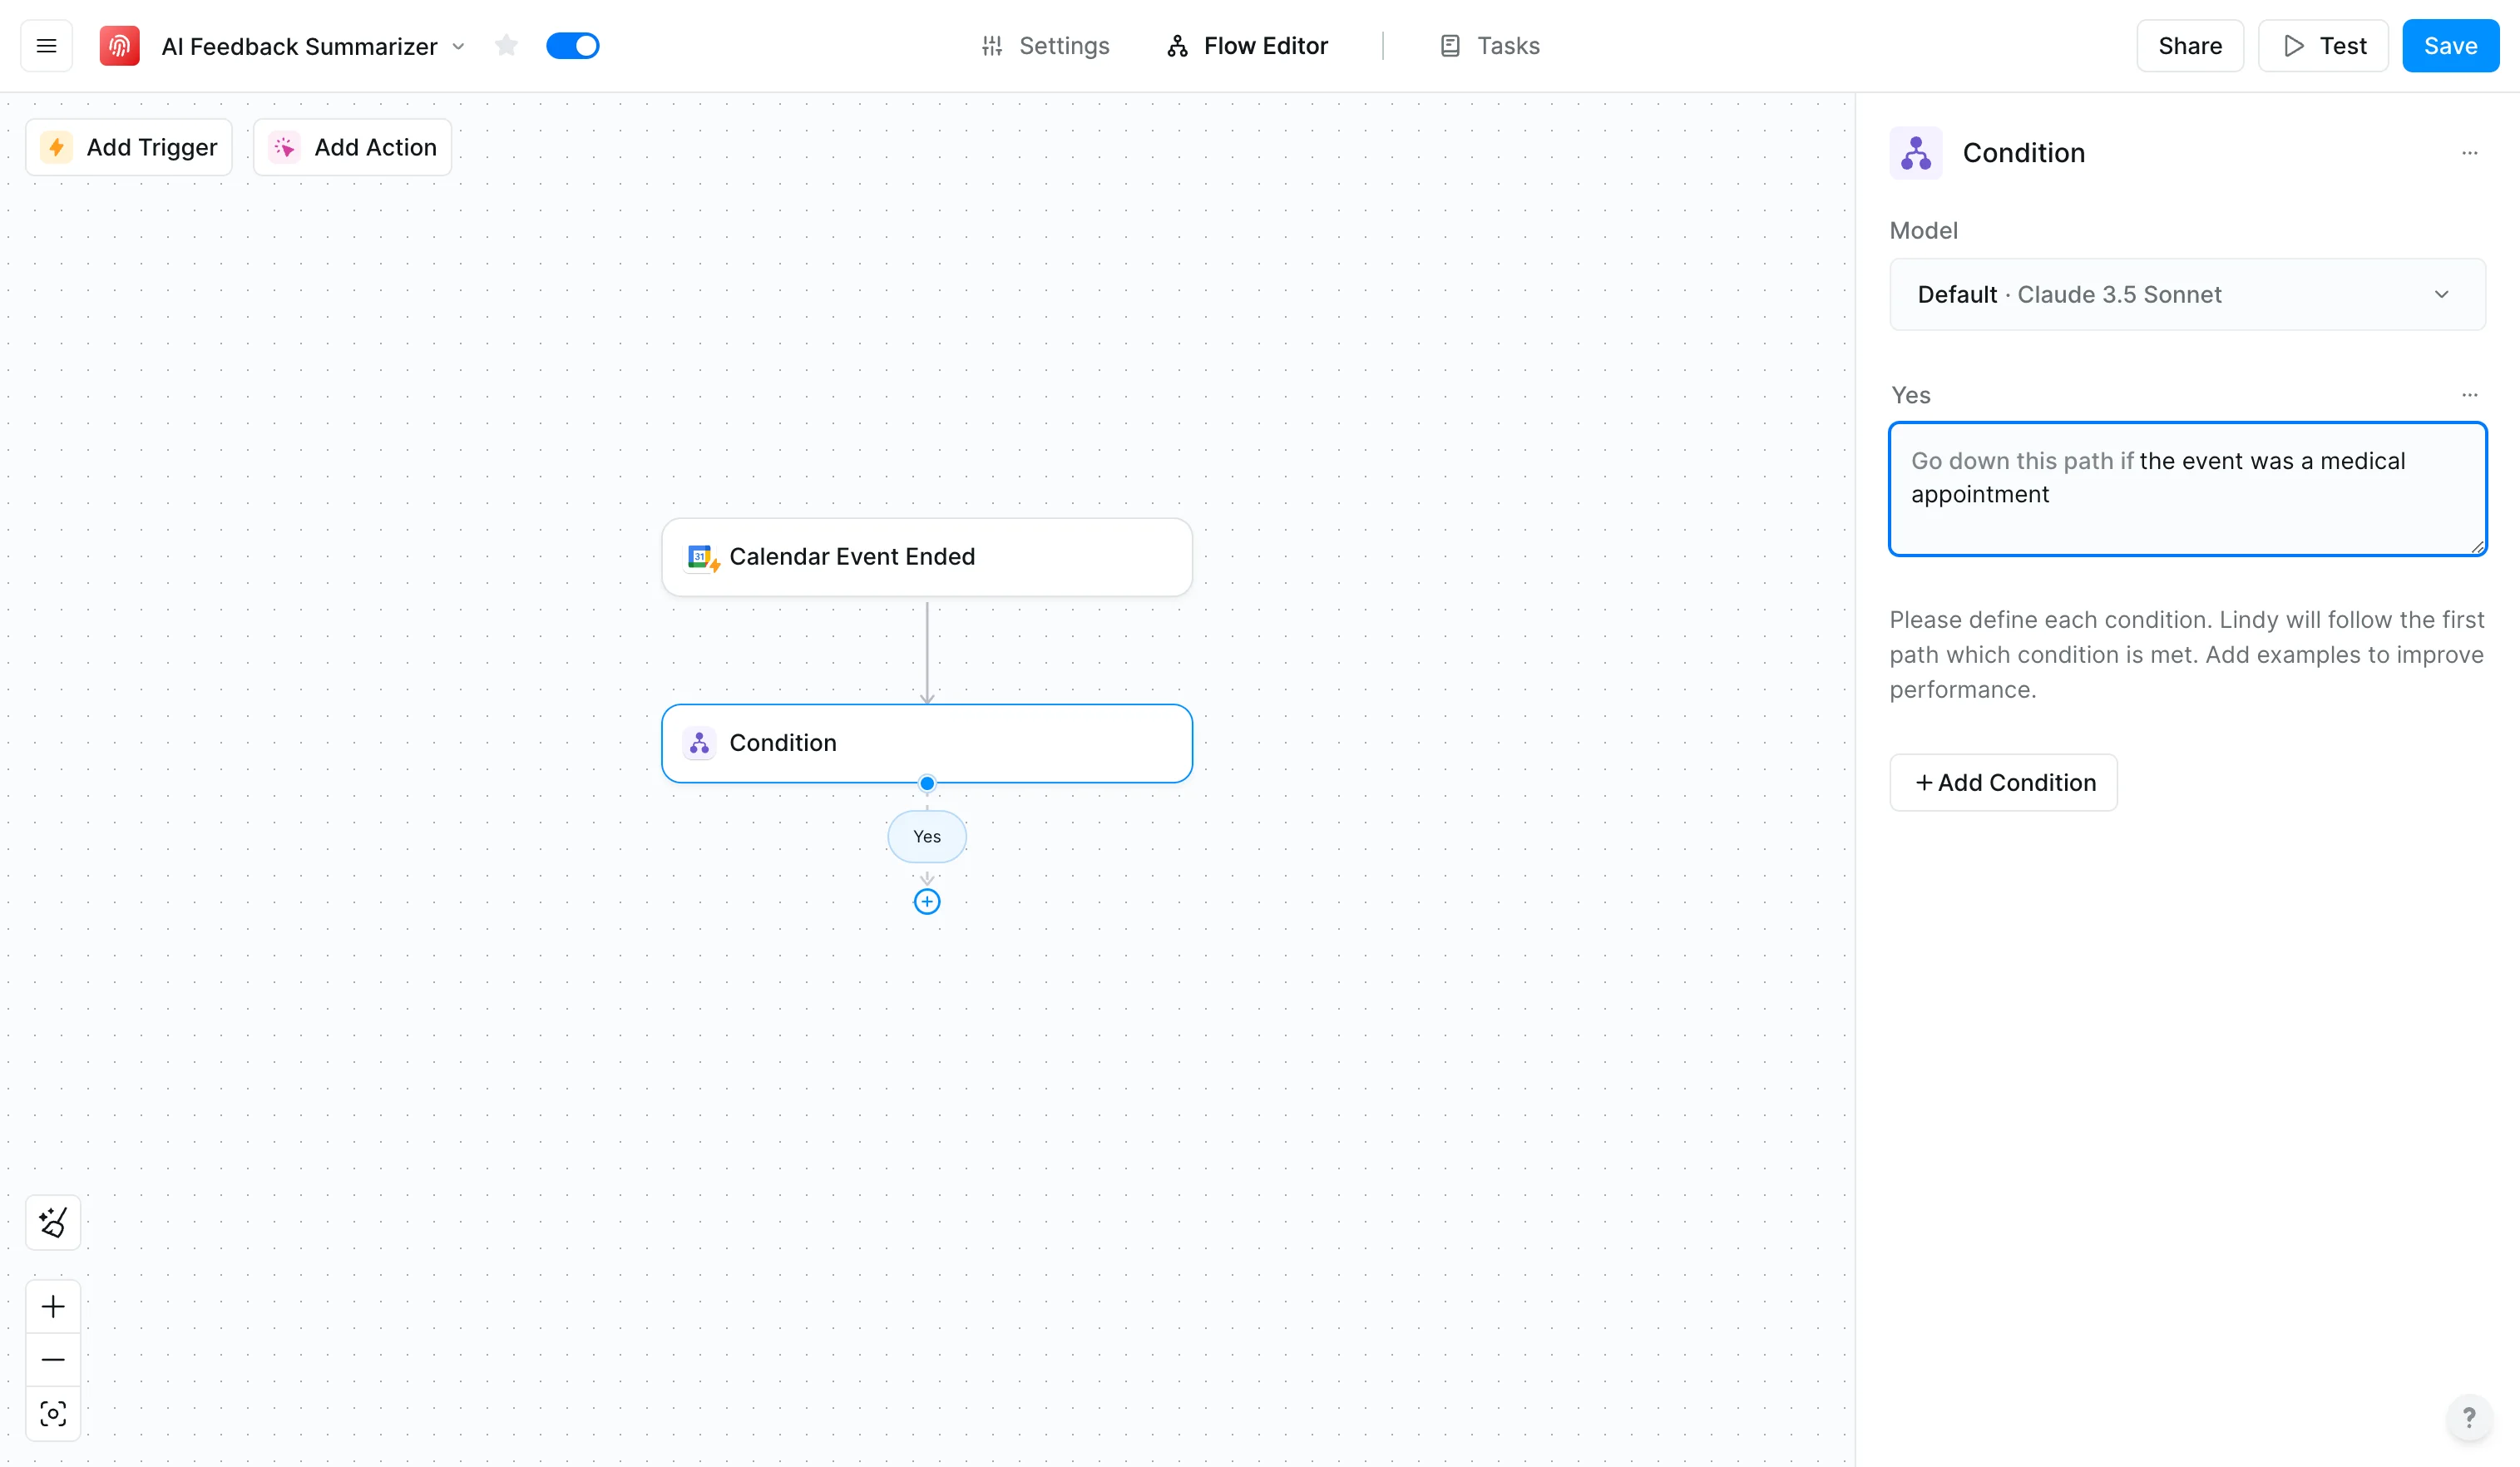
First, let’s add a condition to determine if the event is one for which you need to collect feedback. For example, let’s include a conditional step to check if the event is a medical appointment. This way, the workflow will only be processed when it’s a medical appointment, avoiding requests for feedback on every calendar event booked.
This can be a lifesaver if you have many meetings and appointments.
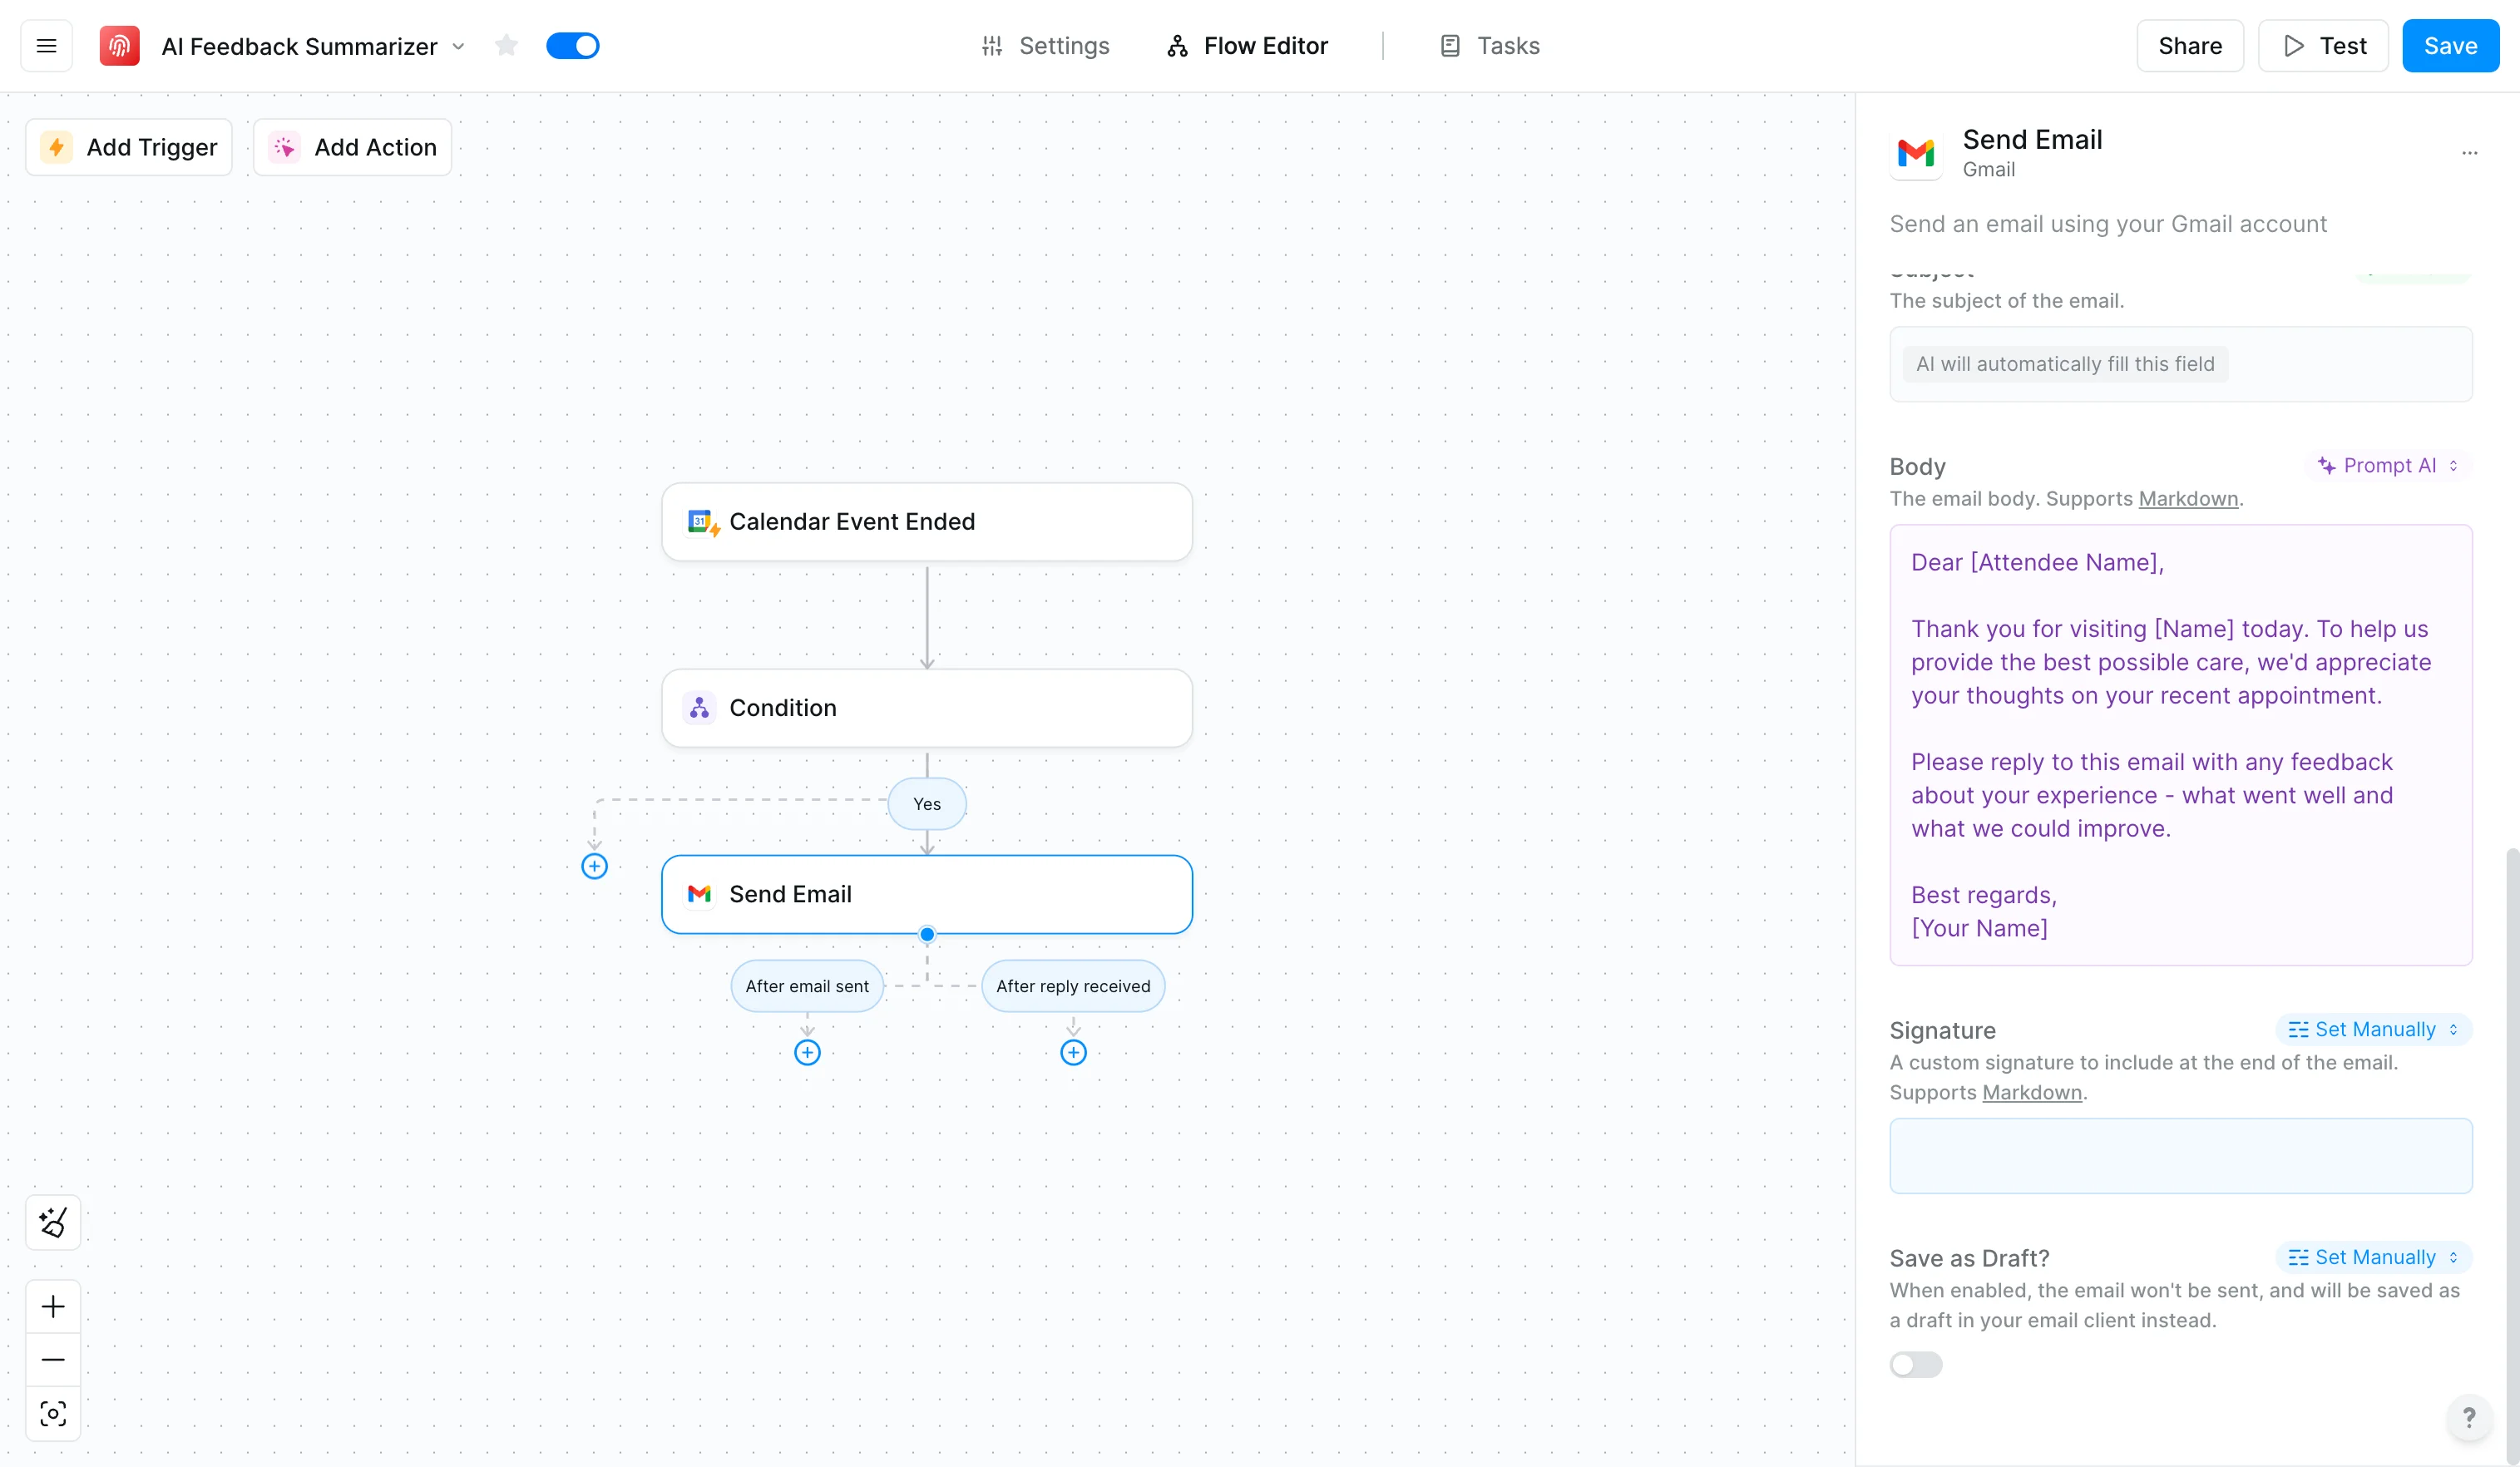
Next, we'll create our feedback request email. Add a Gmail action for sending mail and connect your account. When crafting your email, remember that clear, concise communication often yields better response rates.
Here's an effective template we’ll use in the Body field:
Dear [Attendee Name],
Thank you for visiting [Name] today. To help us provide the best possible care, we'd appreciate your thoughts on your recent appointment.
Please reply to this email with any feedback about your experience - what went well and what we could improve.
Best regards,
[Your Name]
Step 3: Configure AI analysis
The power of our system comes from its ability to automatically analyze feedback and identify urgent concerns. Let's set this up.
First, create a Google Sheet named "Appointment Feedback" with these columns:
- Attendee Name
- Appointment Date
- Feedback Content
- Urgency Level
- Sentiment Score
- Action Required

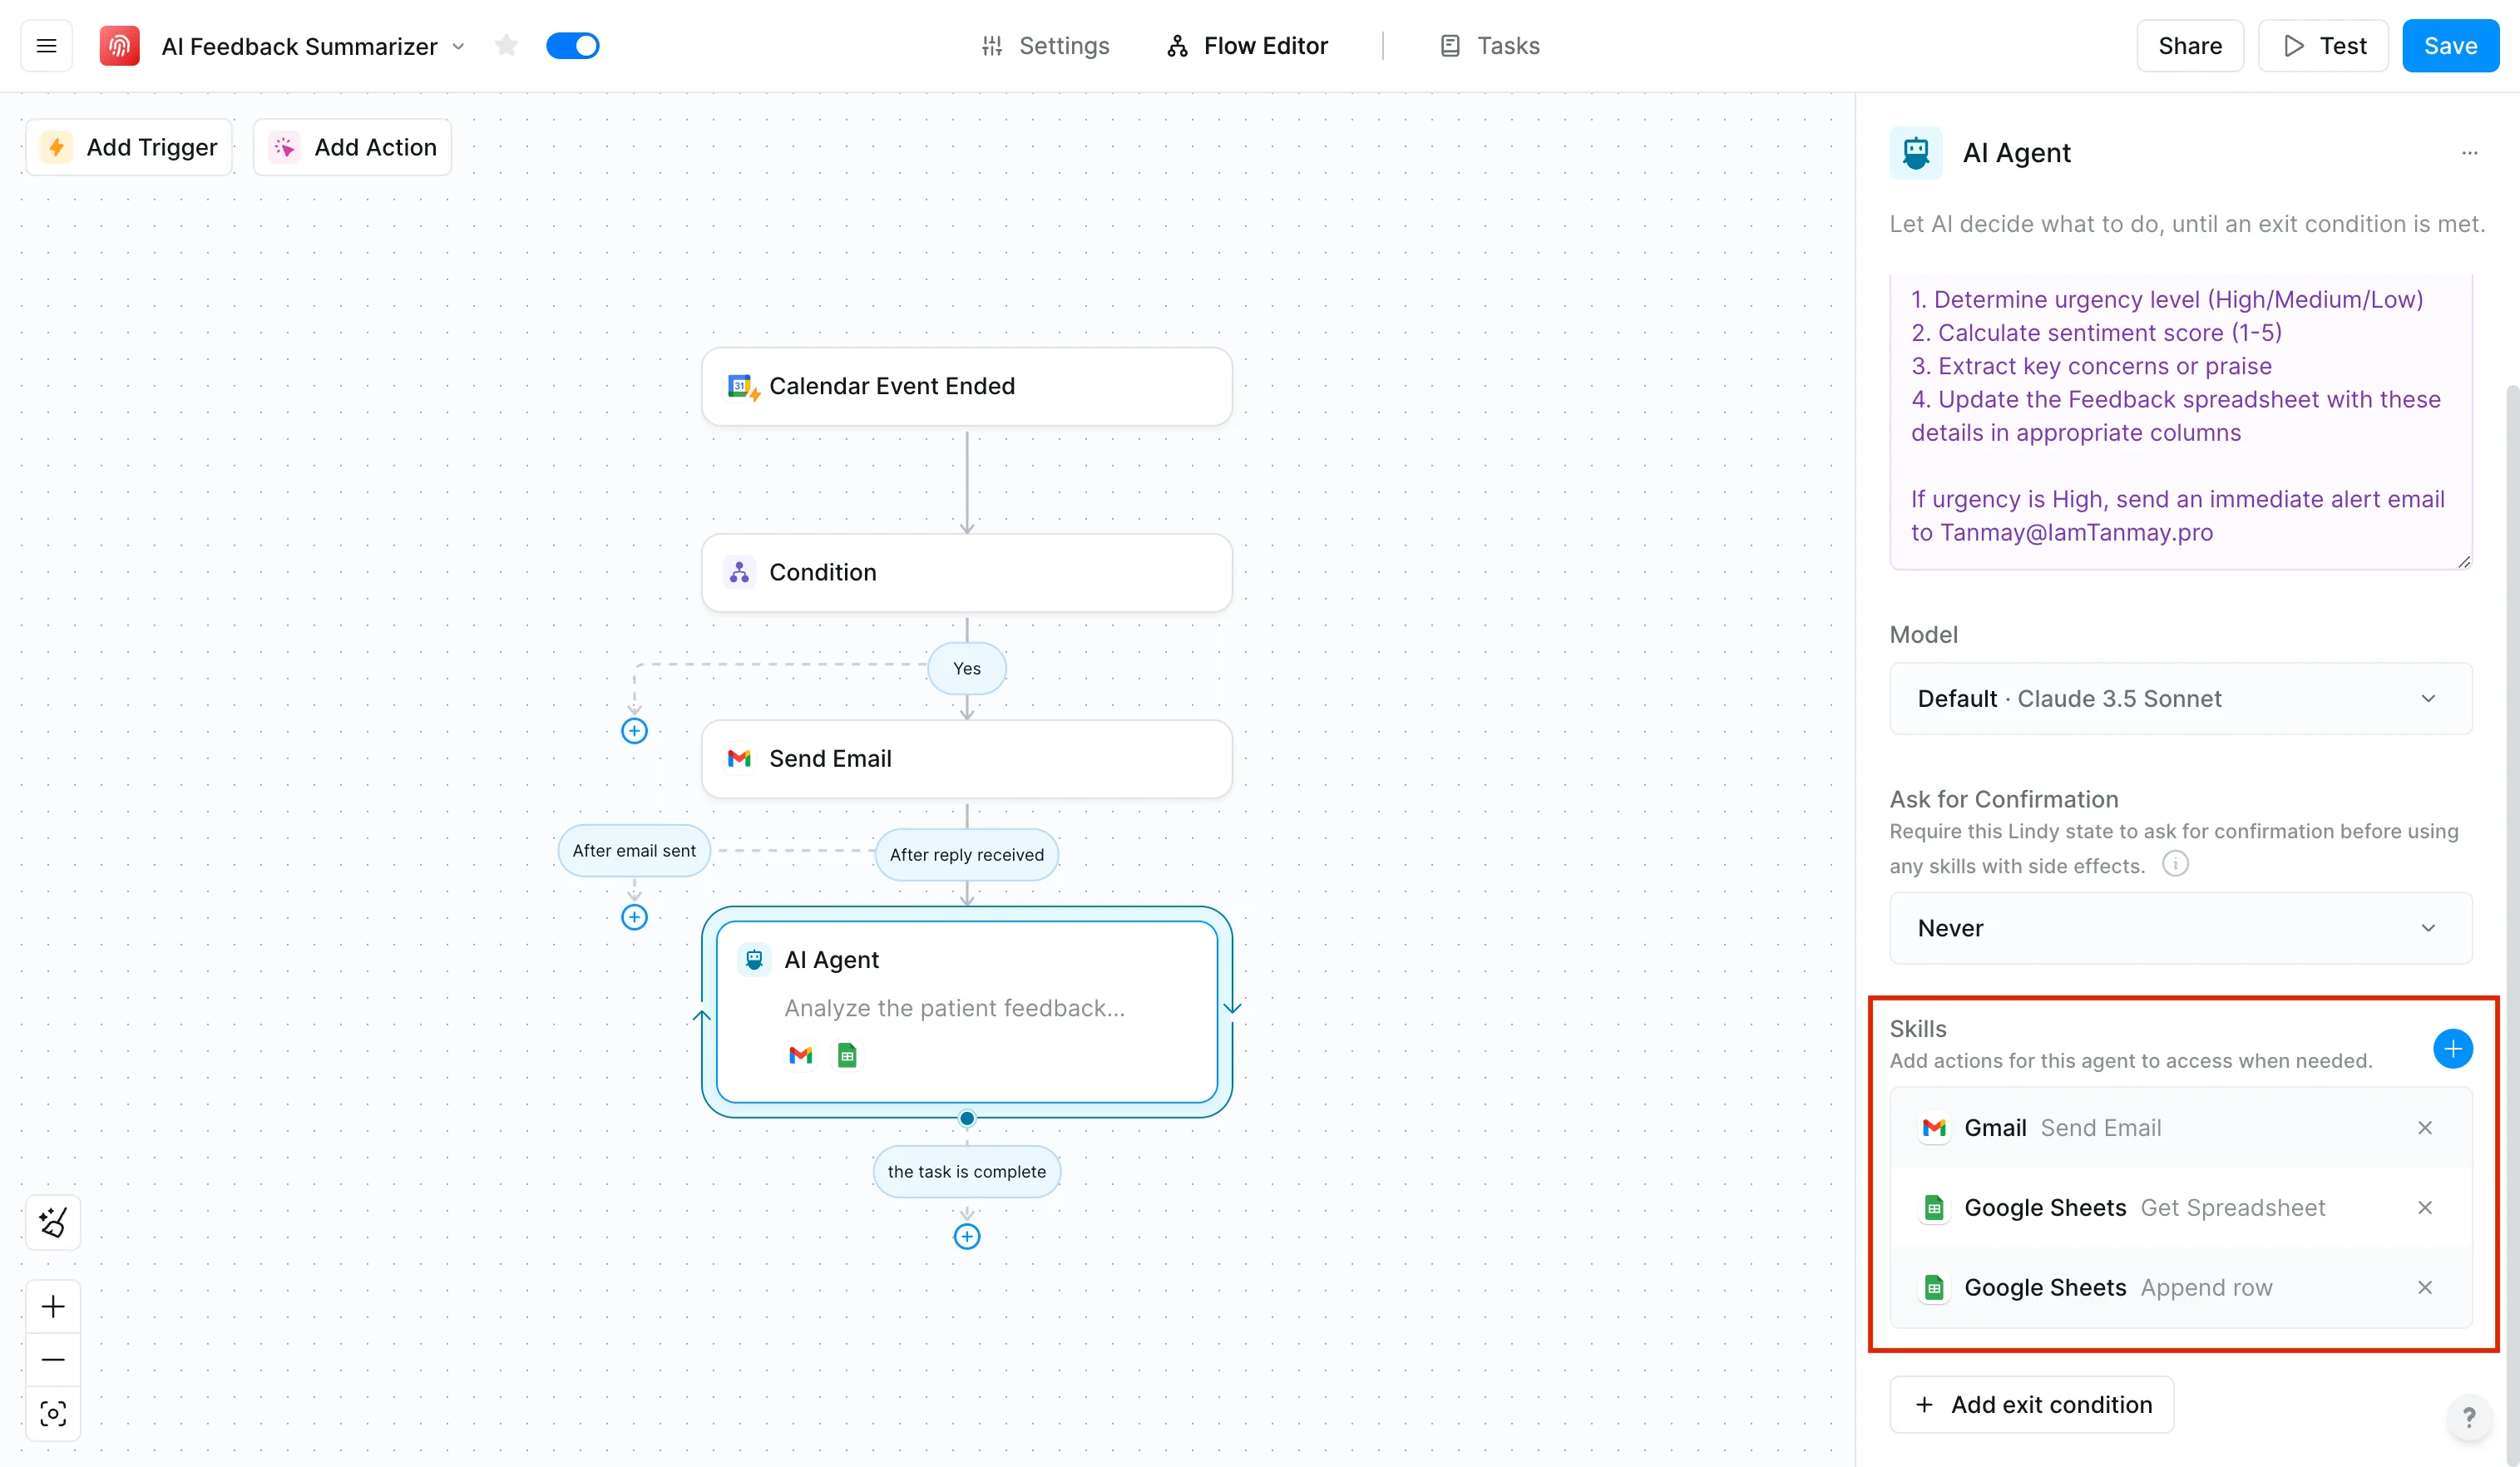
Back in Lindy, add an AI agent to your workflow after the email step. This will analyze incoming responses and categorize them appropriately.
Use this prompt:
Analyze the attached feedback email:
1. Determine urgency level (High/Medium/Low)
2. Calculate sentiment score (1-5)
3. Extract key concerns or praise
4. Update the "Appointment Feedback" spreadsheet with all details in the appropriate columns
If urgency is High, send an immediate alert email to [your mail].
To ensure the AI agent functions properly, add the following skills: send emails via Gmail, retrieve spreadsheets from Google Sheets, and append rows in Google Sheets.
Step 4: Setting up weekly insights
Finally, let's create an automated summary that helps you spot trends and maintain oversight.
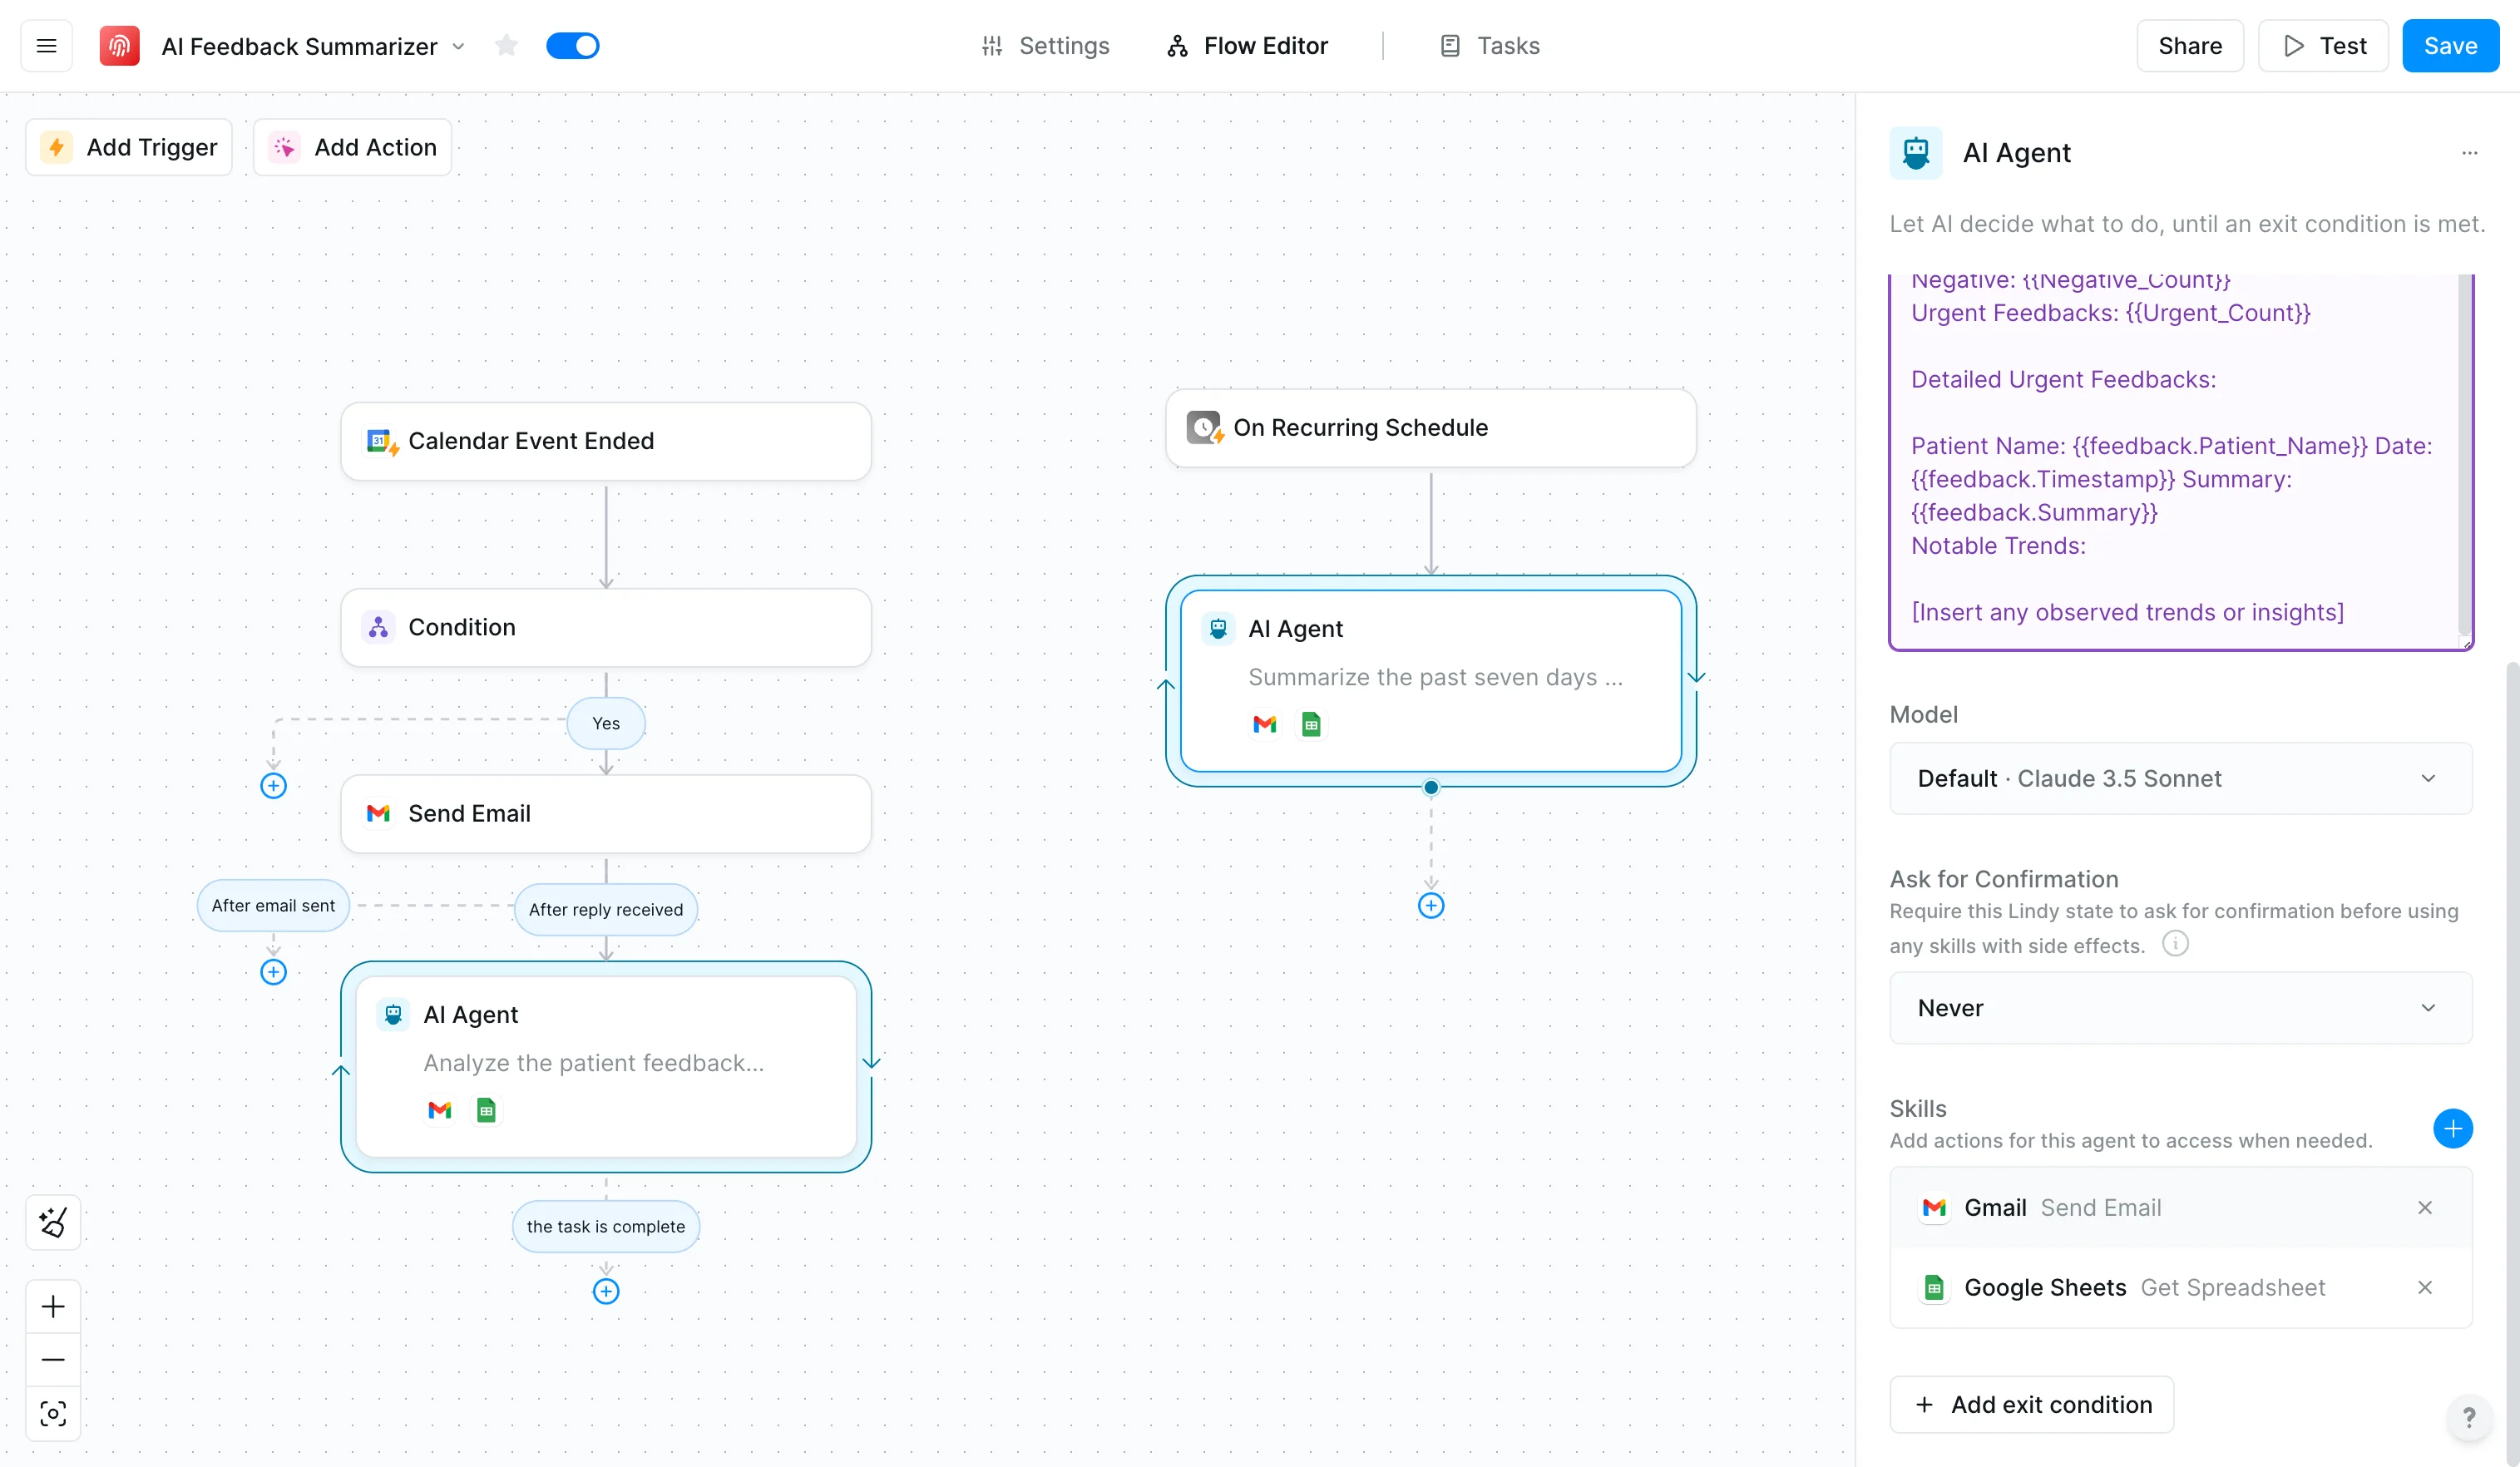
In the same Lindy, add a new trigger (Timer > Recurring Schedule) for your preferred timings (Monday at 8:00 AM). This will generate your weekly summary report.
Now, let’s create another AI agent with this prompt:
Summarize last week's feedback from the Google Sheet titled "Appointment Feedback" and format it into the following report. Then, email it to [Your email here]
Weekly Feedback Summary
- Date Range: [Start Date] - [End Date]
- Total Feedback Received: [Total Feedback]
Sentiment Breakdown:
- Positive: [Positive Count]
- Neutral: [Neutral Count]
- Negative: [Negative Count]
- Urgent Feedback: [Urgent Count]
Detailed Key Feedback:
- Patient Name: [Patient Name]
- Date: [Timestamp]
- Summary: [Summary]
Notable Trends:
- [Insert any observed trends or insights]
We will provide the agent with skills for sending emails in Gmail and retrieving spreadsheets in Google Sheets.
Save your workflow and run a test appointment through the system. This allows you to verify that each component works as intended before deploying it practice-wide.
And that’s it! Your automated feedback system is now ready to help you maintain high-quality feedback in a loop while saving valuable time. The system continuously collects and analyzes attendee feedback, allowing you to focus on addressing critical issues and improving your practice.
Feel free to tweak any parts or sections of the workflow according to your needs and customize it with the services you’re using.
This tutorial was created by Tanmay.