How to create landing pages from screenshots using Claude's Artifacts
Generate a website landing page from a single prompt and screenshot using Claude’s new Artifact feature.
2024-11-13
In this quick tutorial, we’ll use Claude Sonnet 3.5 with Artifacts to code a landing page from a single prompt and a screenshot. That’s right, with just one prompt and a screenshot.
In case you hadn’t heard, Anthropic just dropped a new model, Claude Sonnet 3.5. It’s already besting all LLM benchmarks, crowning it the most intelligent and fastest AI language model as of this posting. Not only did Anthropic improve Claude’s core performance features, but it also added a new Feature Preview, Artifacts, that creates one of the best coding experiences with an LLM chatbot.
With Artifacts, Claude will not only output code but will also let you view the rendered, interactive version of the website without leaving your chat window.
Steps we’ll follow in this tutorial:
- Enable the Artifacts feature
- Generate website code with a single prompt and screenshot
- Edit code with a prompt
- View versions, download, and copy the code
Step 1: Enable the Artifacts feature
To get started, you need to enable the new Artifacts Feature Preview. To do this, if you’re in a chat window with Claude, you can click the little beaker icon below the chat text box.

The Feature Preview window will open. Toggle the Artifacts feature “On” to enable the feature. When you enable Artifacts, it will be enabled by default for all of your future chats.

Step 2: Generate website code with a single prompt and screenshot
Now that we have Artifacts enabled, we can start a new chat with Claude Sonnet 3.5 to generate the code for our landing page. We’ll be generating code for a sample financial company landing page template, but you can select any website you’d like. Make sure to attach your screenshot with your prompt.
Sample prompt:
Generate a website, with the code, that looks like the attached image. [attach image].
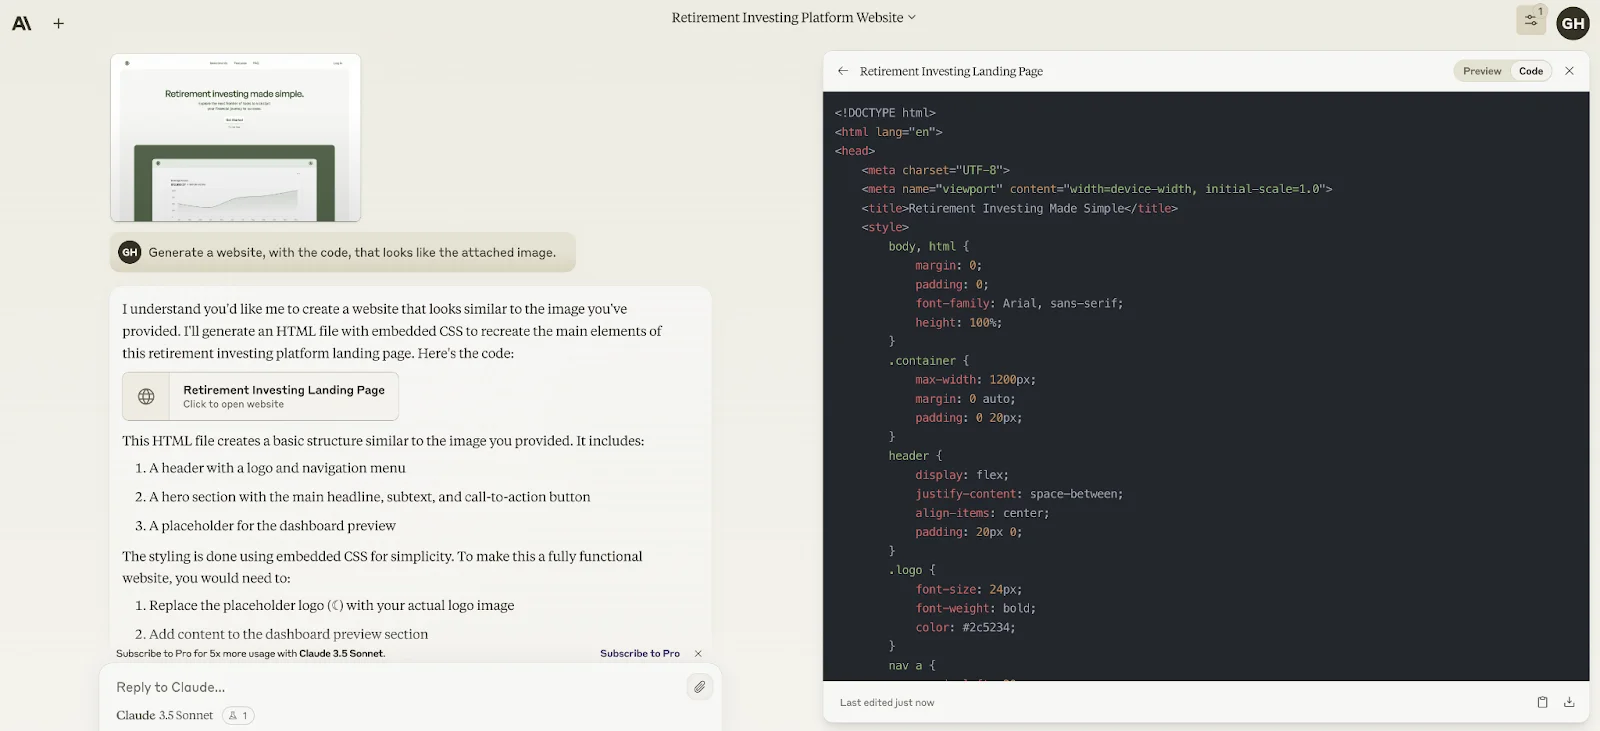
You can click on the Preview tab in the top right corner of the Artifact window to not only view a preview of the landing page but interact with it as well (i.e. click on interactive components like buttons and navigation links).

Step 3: Edit code with a prompt
Now that we have a v1 of our landing page, we can prompt Claude to adjust some of the elements. For instance, I want to center the navigation links at the top of the page and add a shadow to the “Get Started” button.
To do this, we can simply instruct Claude to make the adjustments with a prompt.
Sample prompt:
Can you [insert adjustment #1] and [insert adjustment #2]?

Claude will generate a new version of the landing page code and create a new preview with the adjustments.
Step 4: View versions, download, and copy code
Once you’ve got your landing page to a final state, you can toggle between versions in the bottom left corner of the preview pane to see the code alterations. In the bottom right corner, you can copy the code to your clipboard or download the code as an HTML file.

If you ever exit out of the Artifact window, no worries, you can re-access it by clicking on the Chat Controls icon in the top right corner of the window. You’ll see all Artifacts generated in the chat under the Artifacts section of the Chat Controls pane.

And that’s it! With your HTML file generated, you can add it to a hosting service like GitHub Pages, Netlify, or Firebase Hosting to host your website and make it live. Developing landing pages has never been easier!
This tutorial was created by Garrett.