Develop training materials for your L&D strategy
Design visually appealing, AI-powered presentations and custom learning modules using Gamma.
2024-12-05
Welcome to the third lesson of our course on Executing a successful L&D strategy using AI.
Transforming identified learning gaps into actionable, engaging content is a crucial step in executing a successful L&D strategy. This tutorial builds directly on our previous work, showing you how to take the learning needs we uncovered and turn them into customized, visually appealing learning modules. Of course, you're not limited to just these topics - the process we'll explore can be applied to any learning content your organization requires.
In this tutorial, you will learn how to:
- Use Claude to create detailed content outlines
- Navigate Gamma to design professional presentations
- Customize your content's look and feel to match your brand
- Refine and polish your learning materials
- Conduct a final quality check and review
Let's dive in.
Step 1: Craft your learning material outline
First, we need to create a solid foundation for our learning content. We'll use Claude to generate a comprehensive outline based on the learning gaps we identified in the previous tutorial. You may continue the chat from where we left off in the previous tutorial so that Claude can have the complete context.
Open up Claude and use the following prompt, replacing [identified gap areas] with the specific gaps we uncovered:
Based on the learning gap of [identified gap area], generate an artifact with a detailed outline for a learning module. Structure the outline in a way that can be easily transformed into a presentation or document. Include main topics, subtopics, and key points to cover under each. Ensure the outline flows logically and addresses all aspects of the identified gap areas.
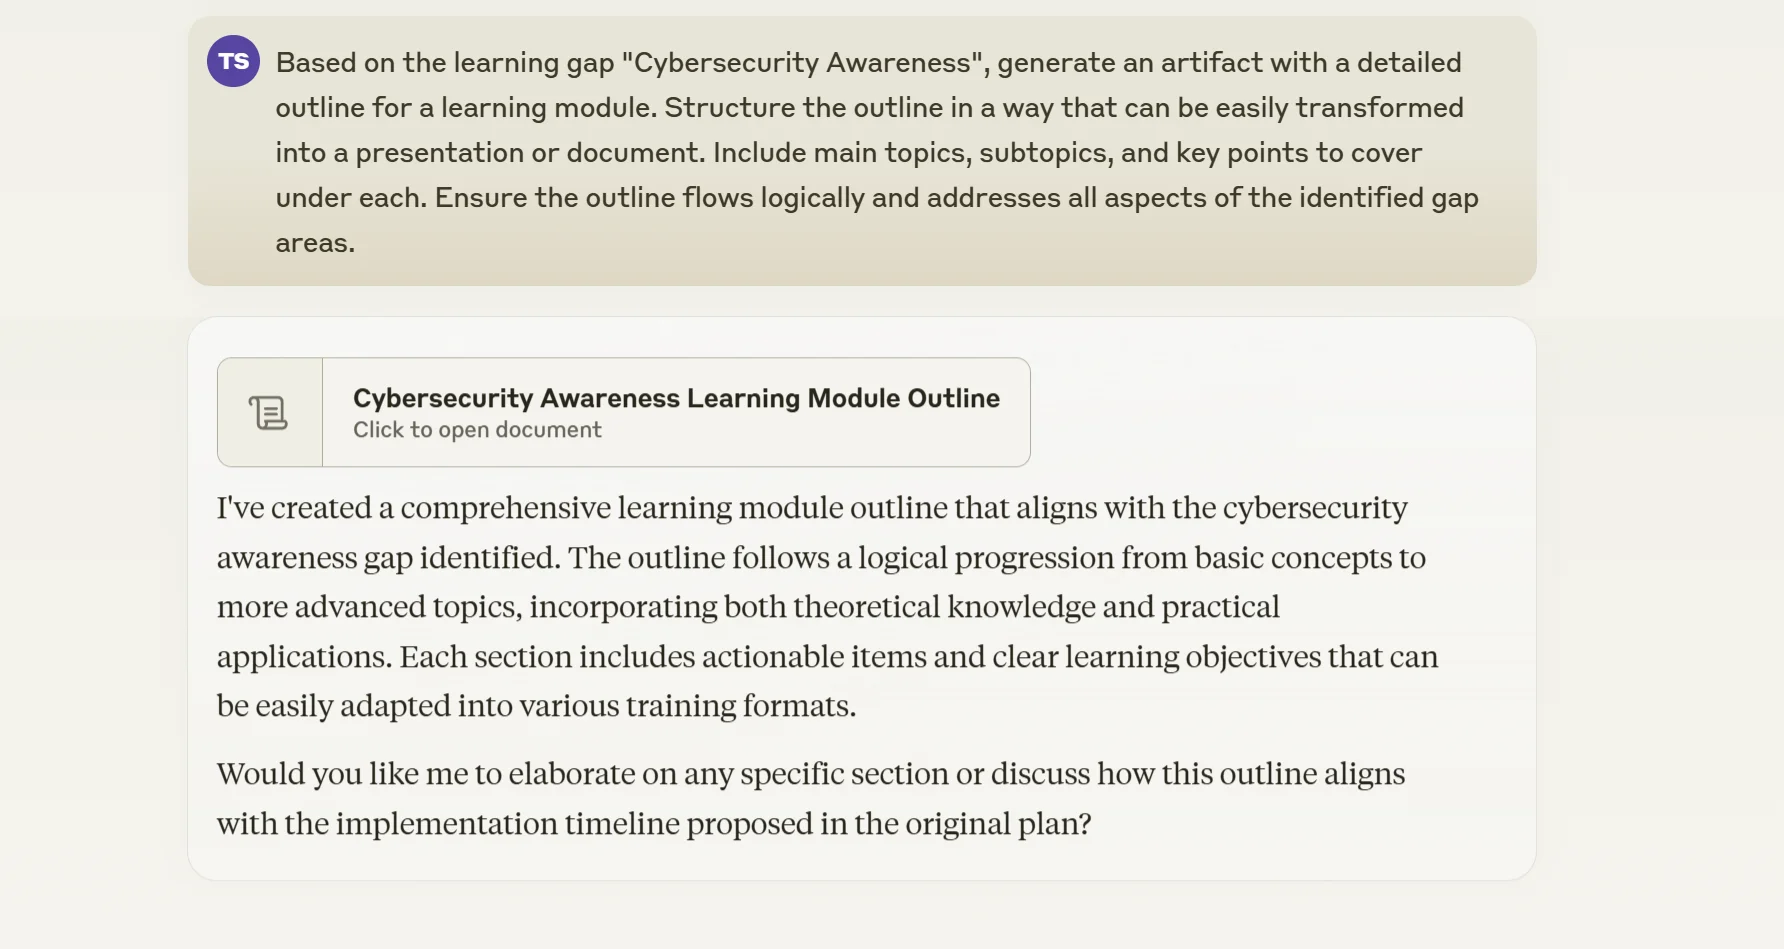
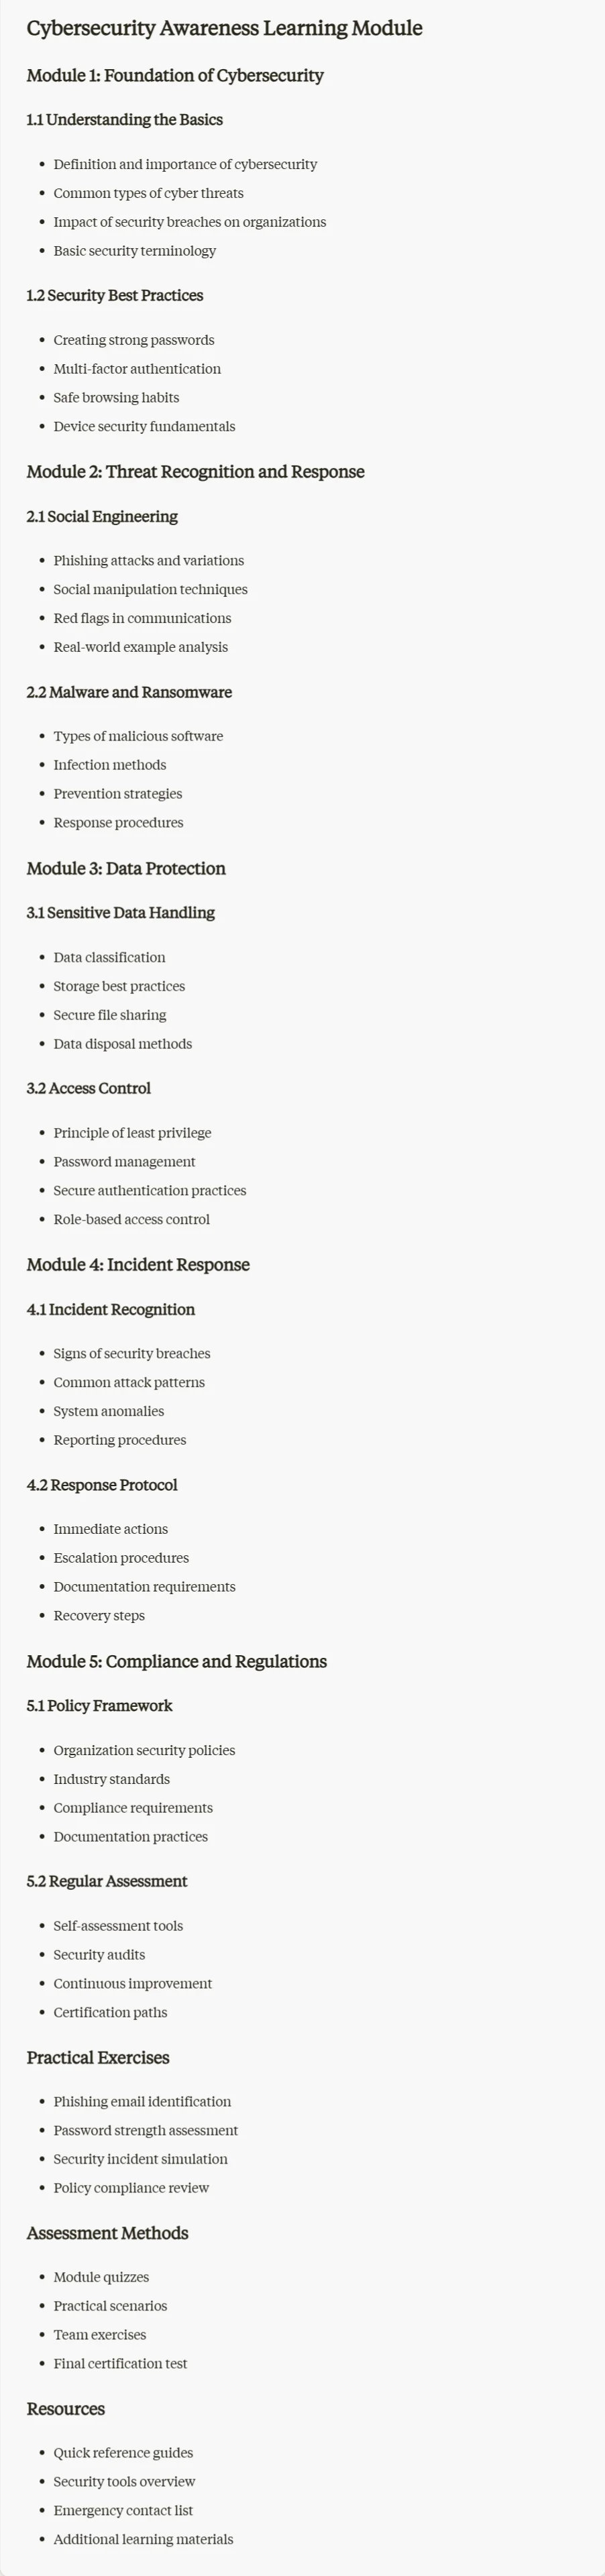
Claude will generate an outline tailored to your specific needs. Review it carefully, making sure it covers all the necessary points and flows logically. Feel free to ask Claude for modifications or expansions on certain sections if needed.
Once you're satisfied with the outline, save it as a text file. We'll use this as the basis for our learning material in the next step.
Step 2: Set up your Gamma.app workspace
Now that we have our outline, let's head over to Gamma to transform it into visually appealing, interactive learning content.
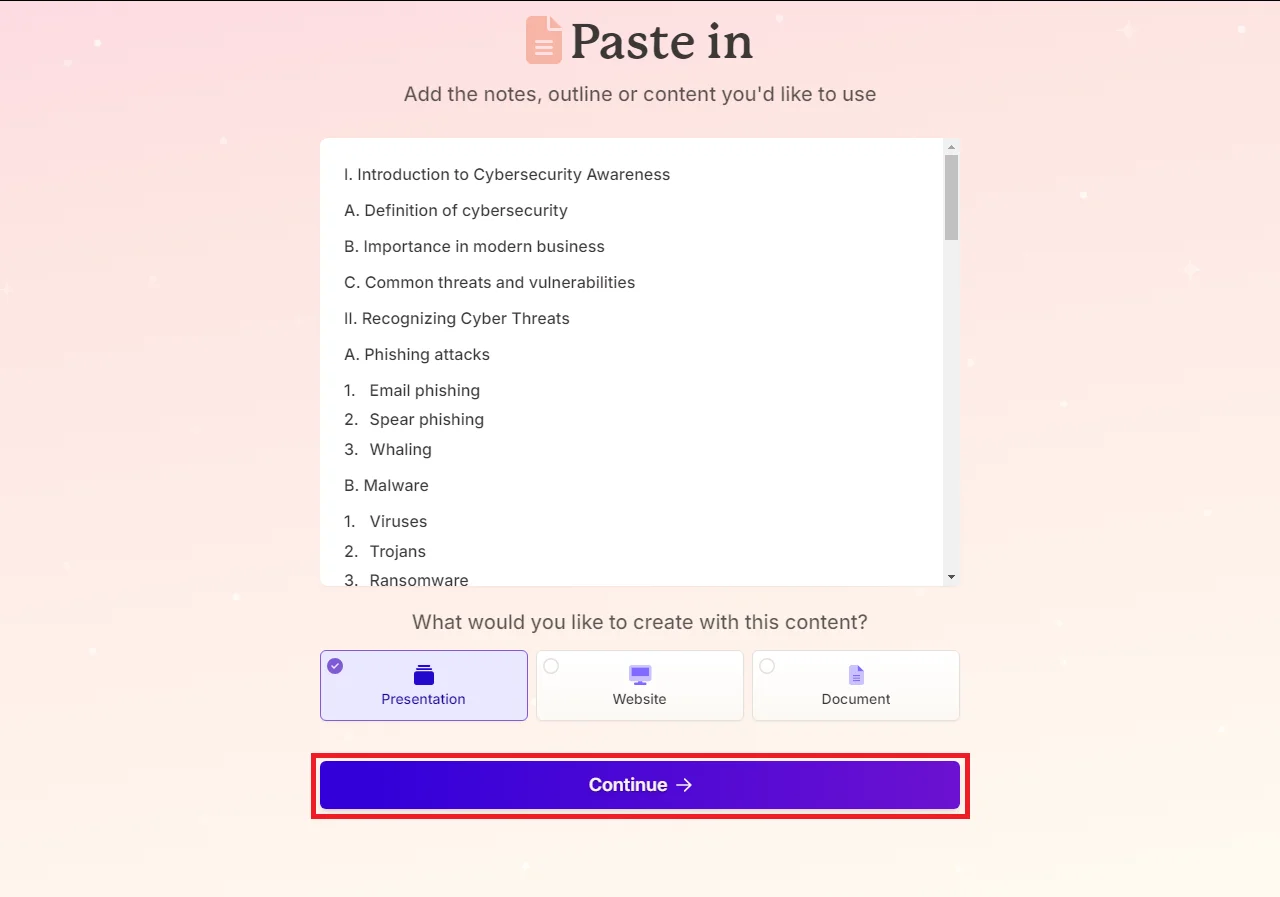
Navigate to Gamma and sign up for a new account. Once you've completed the sign-up process, you'll be redirected to the create page.
On this page, you'll see several options for creating content. Click on the "Paste in text" option. This is where we'll input our outline from Claude.

We have a couple of options here:
- Paste the outline directly into the text box
- Generate content directly from prompt
- Import the file or URL
For this tutorial, we'll paste our outline directly into the text box. However, feel free to experiment with the other options in future projects.
After pasting your outline, click "Continue" to move to the next step.
Step 3: Customize your presentation settings
Now comes the fun part – customizing how your learning material will look and feel. Gamma offers several options to tailor your content.
First, you'll need to choose the format for your learning material. For this tutorial, we'll select "Presentation," but keep in mind that you can also create websites or documents depending on your needs.
After selecting your format, you'll see a range of customization options. Let's go through each one:
- Text content: This determines how closely Gamma follows your original text. For learning material, it's often best to choose "Generate" to ensure all key points are included.
- Amount of text per card: Consider your audience and the complexity of your topic. For most L&D content, "Medium" is a good balance.
- Tone and language: Match this to your organization's culture. For a professional yet engaging tone, "Friendly" often works well.
- Write For: This setting helps Gamma to adjust the language, examples, and depth of content to match your learners' knowledge level.
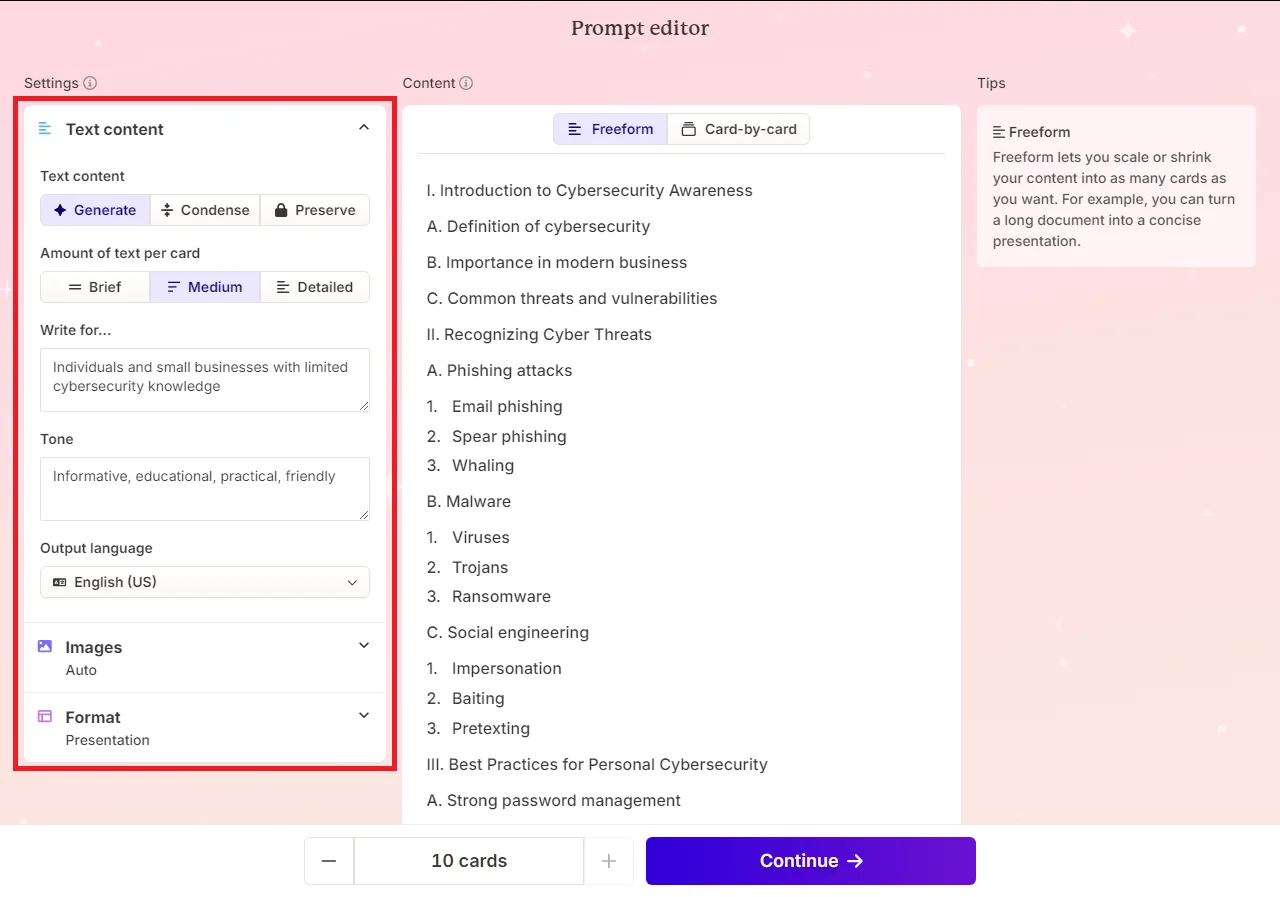
Next, you can decide on image options. Gamma can generate AI images or pull from search results. Select this option based on your specific type of learning content, however AI generated images may offer greater flexibility.
Once you're happy with your settings, click "Continue" to move to the theme selection.
Step 4: Generate and refine your content
Now it's time to bring your learning material to life!
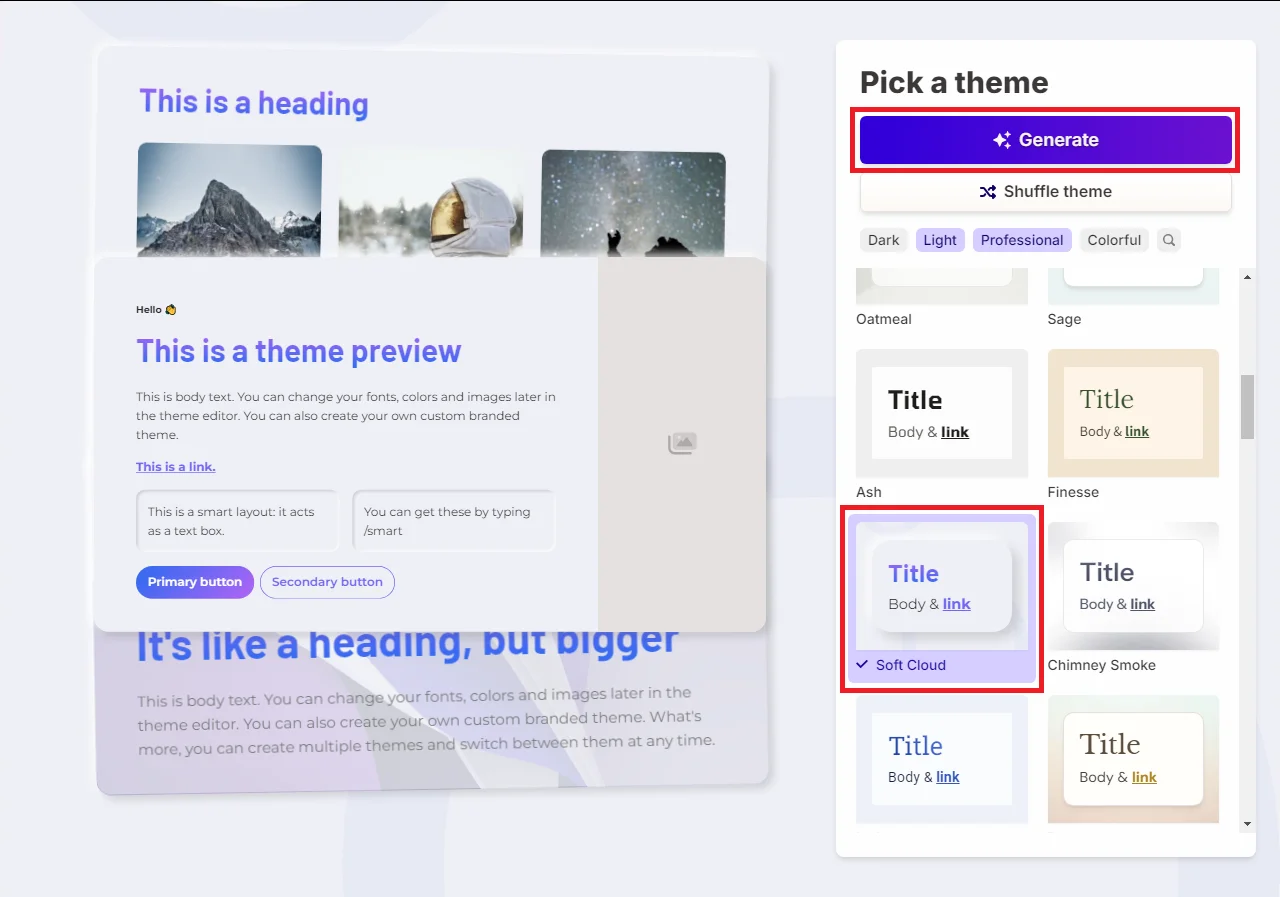
First, select a theme that aligns with your brand colors and overall aesthetic. This helps create a cohesive look and reinforces your brand identity.[Space for screenshot]
With your theme selected, click "Generate." Gamma will now work its magic, transforming your outline into a fully-fledged presentation.
Once generation is complete, take some time to review each slide carefully. Here's what to look out for:
- Content accuracy: Ensure all key points from your outline are covered.
- Flow and logic: Check that the presentation progresses logically.
- Visual appeal: Assess if the images and design elements enhance understanding.
- Branding consistency: Verify that the presentation aligns with your organization's visual identity.
If you need to make changes, Gamma makes it easy. You can edit text directly on each slide, replace images, or even regenerate individual slides if needed.

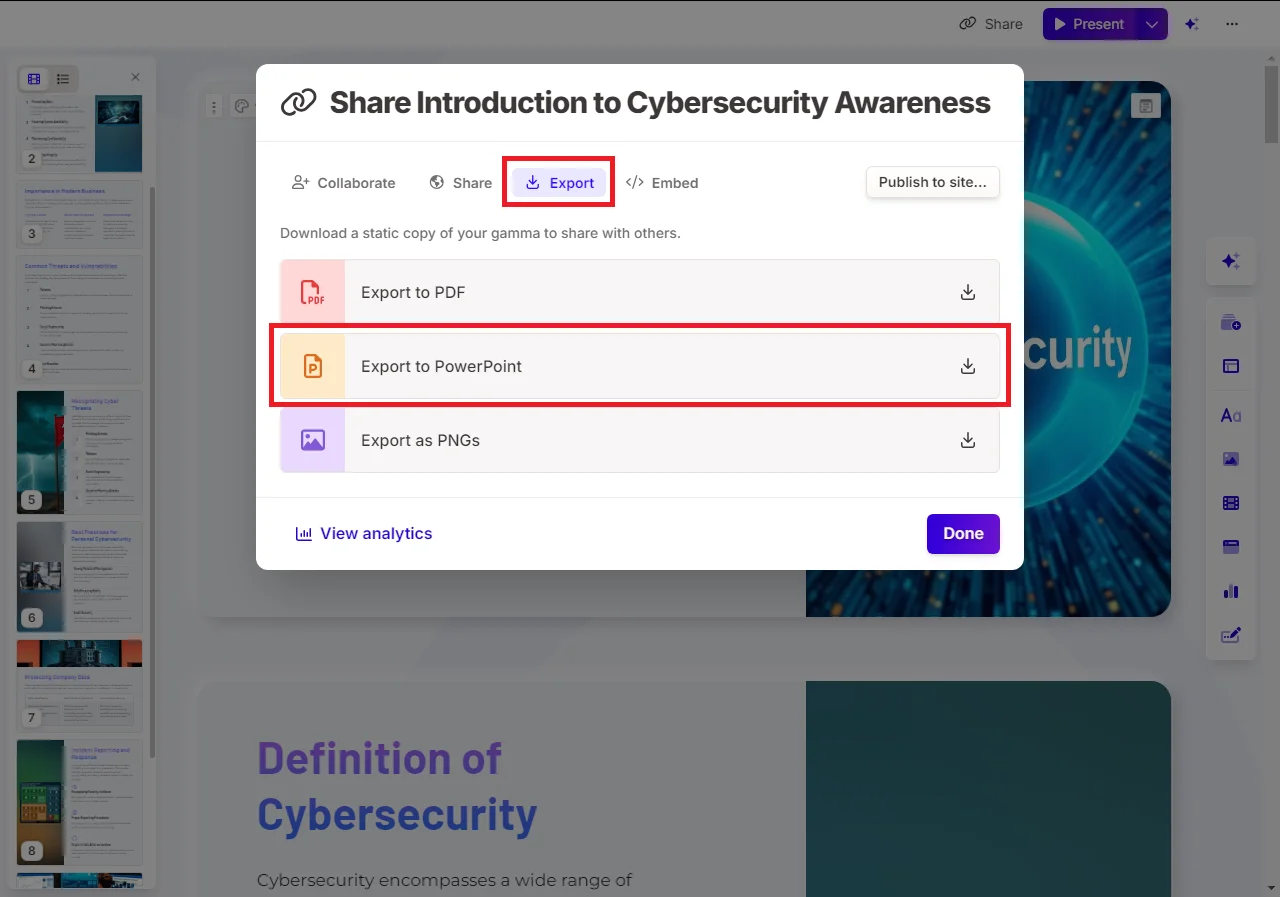
When you're satisfied with your presentation, it's time to export. Click the "Share" button in the top right corner, then under the Export tab, select "Export to PowerPoint." This gives you a familiar file format that's easy to distribute or further customize if needed.
Step 5: Create assessment tests
Now that we have our learning material ready, let's create an assessment test to evaluate learners' understanding and retention. We'll use Claude to generate a test based on the content we've created, focusing on multiple-choice questions (MCQs) and true/false questions.
First, export your presentation as a PDF from Gamma if you haven't already. Then, upload this PDF to Claude and use the following prompt:
Based on the learning material in this PDF, generate an artifact with an assessment test containing [number] questions. Follow these guidelines:
1. Include a mix of [X] multiple-choice questions and [Y] true/false questions.
2. For multiple-choice questions, provide four options including the correct answer with a brief explanation.
3. Ensure questions cover a range of difficulty levels from basic recall to application of concepts.
4. Format the output so it's easy to import into a Learning Management System (LMS), with clear delimiters between questions.
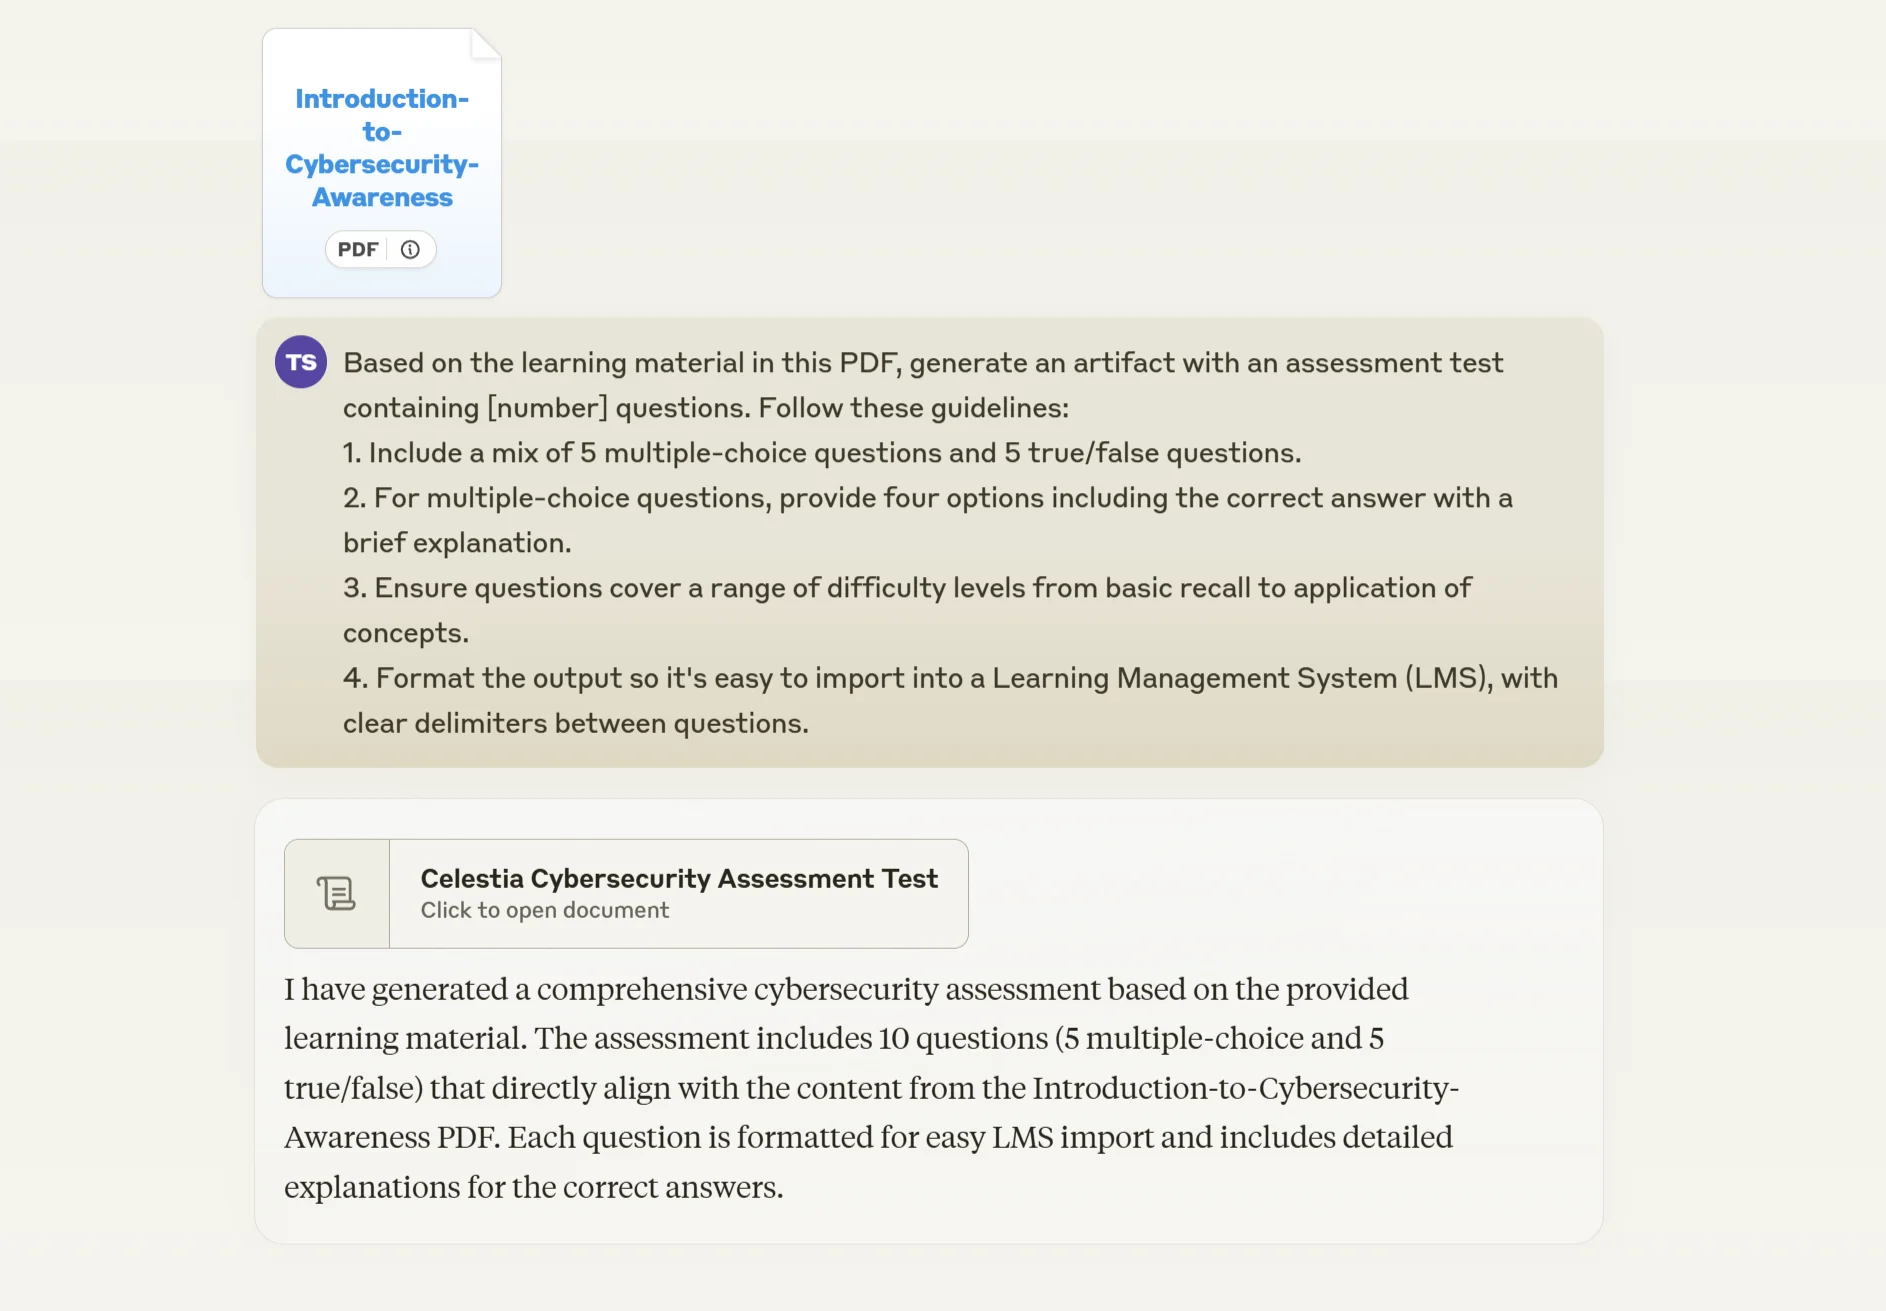
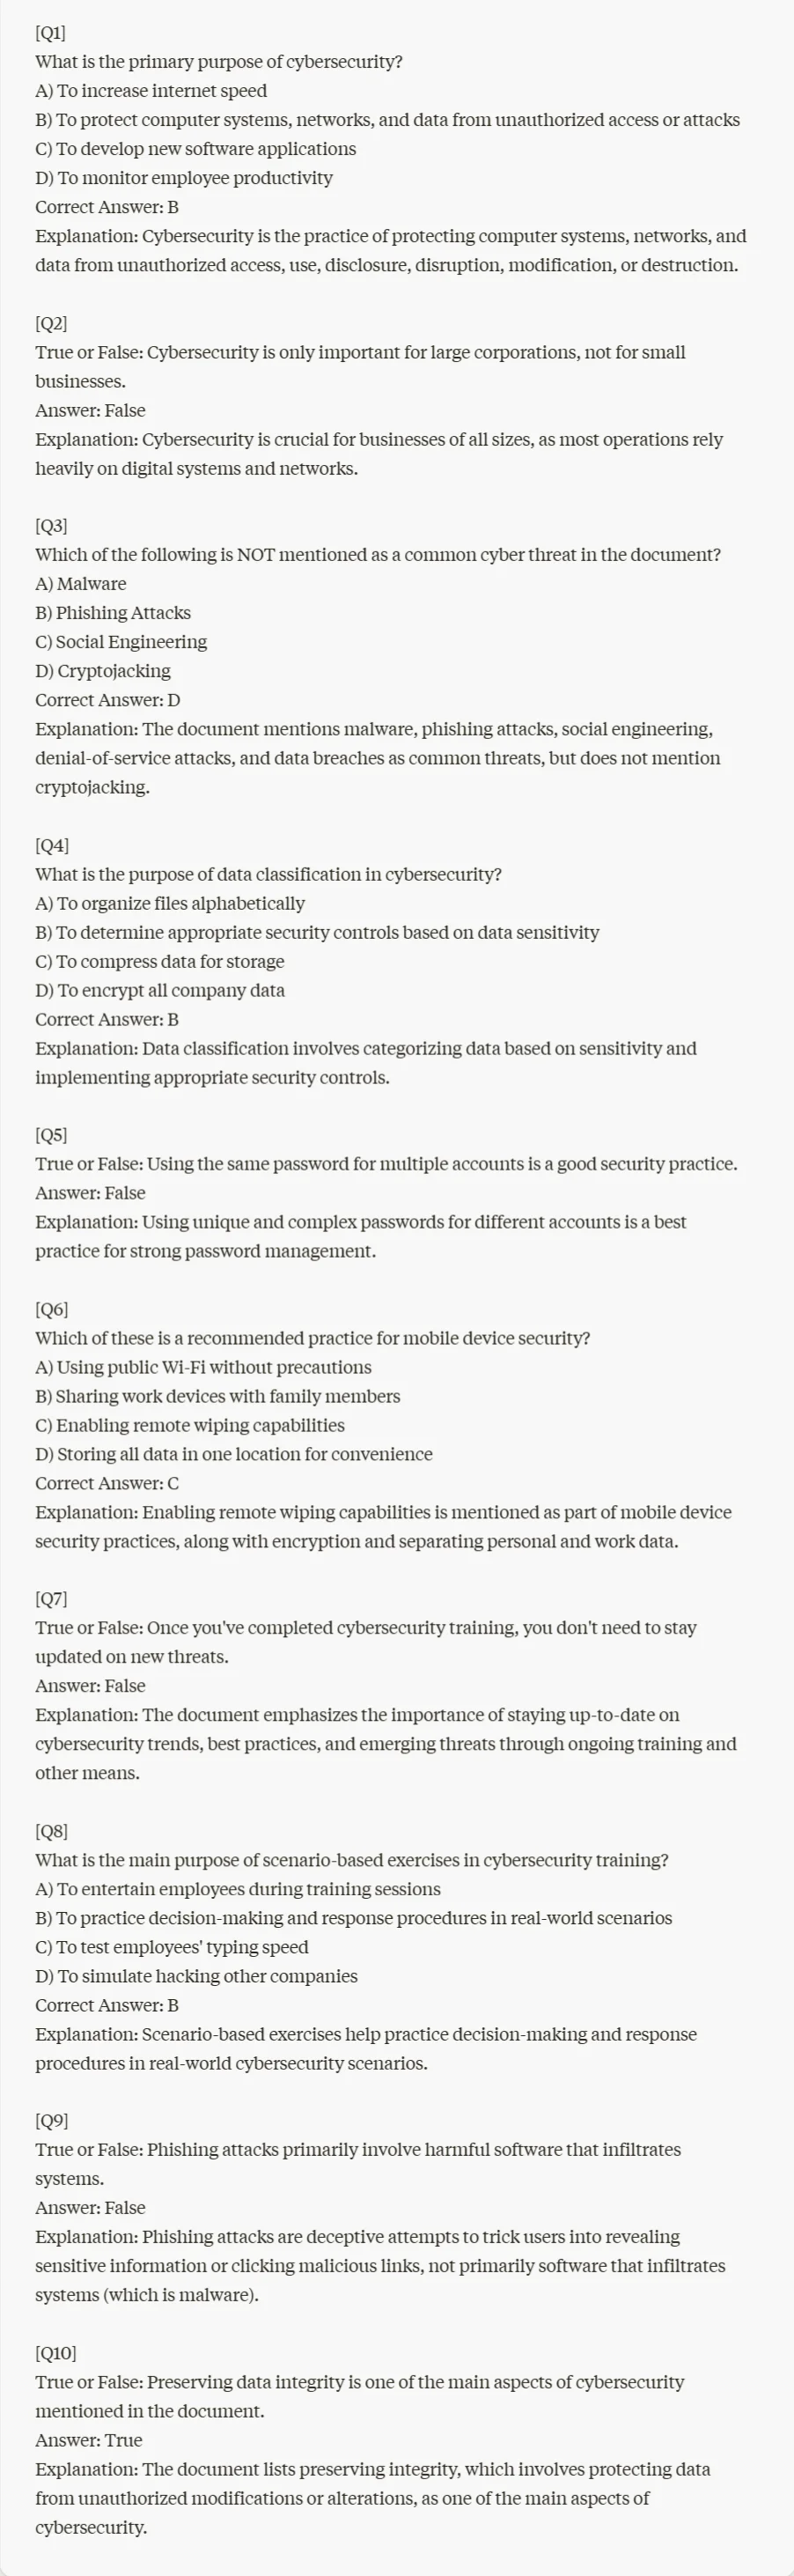
This comprehensive prompt should generate a well-structured assessment test tailored to your learning material. Review the questions carefully, making any necessary adjustments to ensure they align perfectly with your learning objectives and organizational needs.
With these steps, you've not only created engaging learning content but also developed a robust assessment to measure its effectiveness.
This tutorial was created by Tanmay.