Embed native text-to-speech audio into your blog posts
Learn how to embed native text-to-speech audio players into your blog posts with ElevenLabs’ Audio Native.
2024-11-13
You might’ve noticed that on our tutorial and course pages, you can listen to the content with our native audio player. No, we didn’t build or record this audio experience from scratch ourselves - we used ElevenLabs’ Audio Native feature to auto-convert our written content into embedded, playable audio translations.
In this tutorial, we’ll show you how to set up this audio experience for your blog, newsletter, or website. We’ll be using Typedream in this tutorial as our website builder. But, regardless of what website builder you use, you should be able to get up in running with audio versions of your written content in under 30 minutes with ElevenLabs’ Audio Native tools.
Steps we’ll follow in this tutorial:
- Add your website domain to your Audio Native allowlist
- Select a voice and model for your player
- Customize the look of your player
- Finalize additional player settings
- Embed the Audio Native player on your website
Step 1: Add your website domain to your Audio Native allowlist
To get started, go to the ElevenLabs website and make an account if you don’t have one already. Note, that you’ll need a Creator account or higher to use the Audio Native feature. Once you have an account, navigate to the Audio Native tab in the left side navigation.

ElevenLabs has an onboarding experience for Audio Native, but we’re going to skip that flow and jump right into the full experience. To do that, click the “Skip onboarding” button at the top of the page and you’ll get dropped into the Audio Native dashboard.
Click on the “Settings” tab in the top navigation and the “General” tab in the sub-navigation. The first thing we’re going to do is add URLs from our website to the Audio Native allow list.

To do this, click the “Add URL” button in the URL allowlist section.

This will open a side panel where you can add a single URL. Note, if there are multiple URLs you want to add to your allowlist, you can click the “Add URL” button multiple times and go through this flow to add each URL.

Once you add your URLs to your allowlist, you’ll see them appear in the URL allowlist section.

Step 2: Select a voice and model for your player
Once your allowlist is complete, you can select the voice and model for your player. To do this, click on the “Player” tab on the Settings subnavigation. The player will default to the v1 ElevenLabs model, ElevenLabs recommends updating this to the v2 model. To update the model, click on the model and update it in the side panel.


With the model updated, we can now test voices and select the one that fits our brand and style. To do this, click on the Voice dropdown. You can preview the voices by clicking on the play button next to the name. We’re going to go with the Arnold voice for this tutorial.

Step 3: Customize the look of your player
Now that the voice and model are set, we can set the player's appearance. To do this, scroll down on the same Player Settings page, and click on the background color hex box to change the background color. By default, it’s set to white. We’re going to update it to black because our test website has a black background.

With the background color set, click on the text color hex box to change the text color. We’re going to update the text color to white. You’ll notice that ElevenLabs provides a preview of the player so you can see the color updates in real time.

Step 4: Finalize additional player settings
With the colors set, we can now finalize the remaining settings for the embedded player. Note, that you can think of these additional settings as optional. We’re not going to change them in this tutorial, but we’ll walk through some of the most important ones so that you’re aware of what they do.
First, you can set the Title and Author for the embedded player, if it’s your blog, you might want to set the Author to your name and toggle the “Always use this title and author,” otherwise, ElevenLabs will attempt to extract them from the page and only present the settings here when the data can’t be extracted.

In addition, you can pass certain CSS selectors to the Audio Native player to target or block certain sections on your page. For instance, if you have multi-widget pages, you can use this to ensure ElevenLabs only targets your main blog content for the audio player experience.

Step 5: Embed the Audio Native player on your website
Now that your Audio Native player is all set up, we can embed it on your website. To do this, navigate to the “General” tab in Settings and click the copy to clipboard icon in the Embed code card.

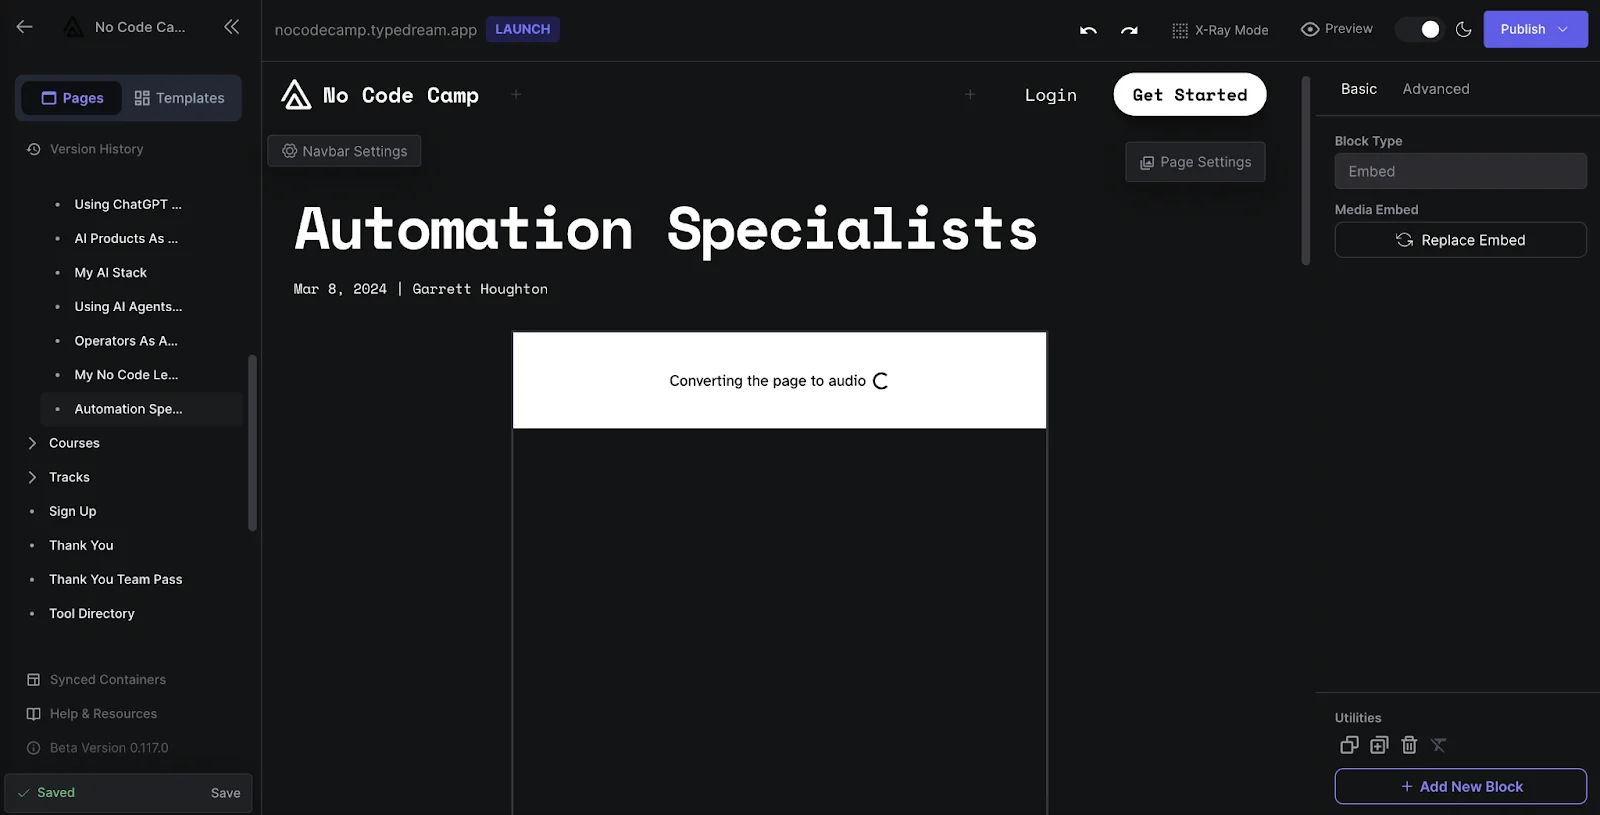
Go to your website builder, in our case, Typedream, add an HTML component, and drop the code you copied into this component. You might need to resize the component within your builder based on how it renders.

When embedded, the Audio Native player will spend some time converting the written text on the page into audio.
You can also track the progress in the “Pages” tab of the Audio Native dashboard in ElevenLabs.

And that’s it! Once the audio conversion is complete, you can go to your live blog post page, check out the player, and listen to your content read aloud.

This tutorial was created by Garrett.