Use AI to add outbound SEO links to blog posts
Learn how to streamline SEO efforts by using AI and Zapier to automatically identify and add outbound links to blog posts.
2024-11-13
A good SEO practice when writing articles is to include some outbound links to authoritative websites.
Using AI and Zapier you can turn this from a time-consuming chore into a fully automated process. AI will select anchor phrases from the article and Zapier will search the internet for suitable links and update the post.
In this tutorial you will learn how to:
- Create an Airtable base and Zapier workflow to manage the process.
- Use the OpenAI API to find suitable anchor phrases in the post.
- Use the Brave Search API to find external links for each anchor phrase.
- Update the post in Airtable.
You’ll need:
- Zapier paid account.
- An OpenAI Platform account and at least $10 of credit. Note: this is separate from their ChatGPT app.
- A Brave Search API account.
Let’s see how it’s done.
Step 1: Create an Airtable base and Zapier workflow to manage the process
For this tutorial, we’re going to run the process from an Airtable base. However, you could easily use Notion, a CMS app or even Google Sheets.
Go to Airtable, click + Create in the bottom left corner and select ‘Start from scratch’.
You can customise the table to your needs, but at a minimum, you need the following fields as columns:
- Title - The title of your article.
- Status - Create one dropdown option here called “Go”. Switching a record to this status will be used to trigger our automation.
- Keyword - A single word that summarises the subject of the article.
- Post - The copy for your article.
I’ve also added a sample article to the Post column - about Gouda cheese.

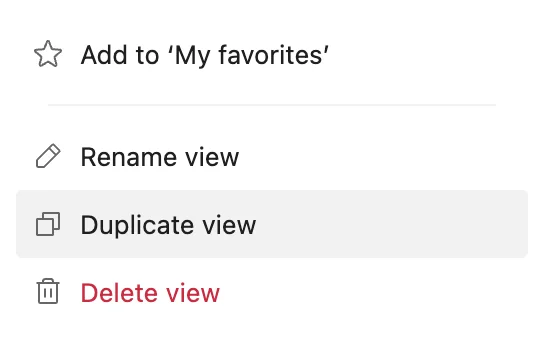
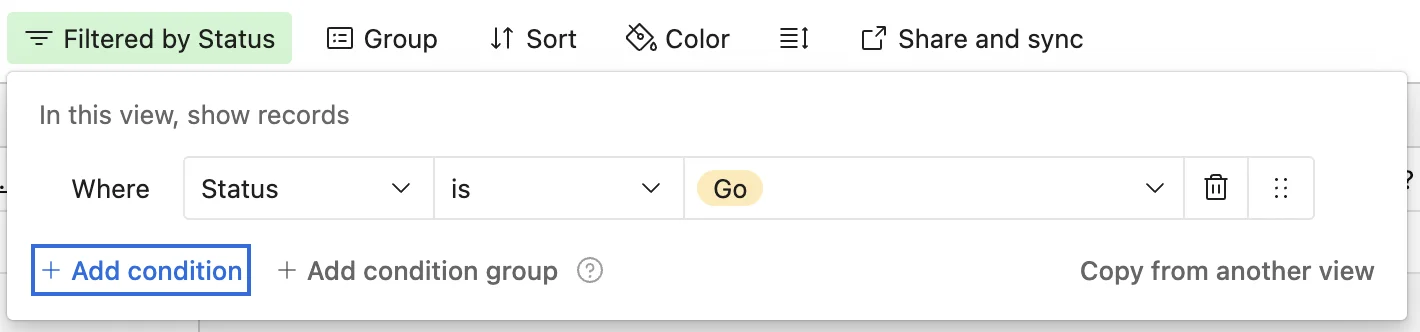
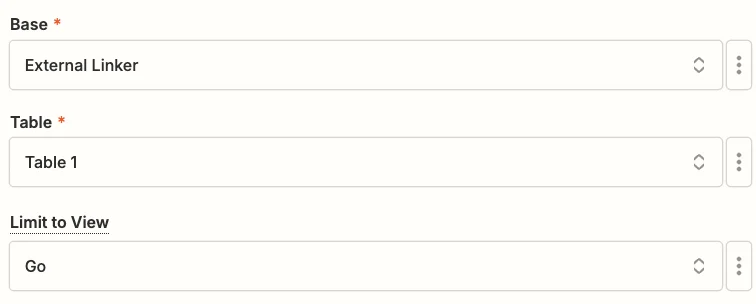
Next, under the “View” tab you should rename the current view to ‘All’, then right-click and select “Duplicate view”, and call the new view ‘Go’.
Then apply a filter to this new view to only show records where “Status” is ‘Go’.
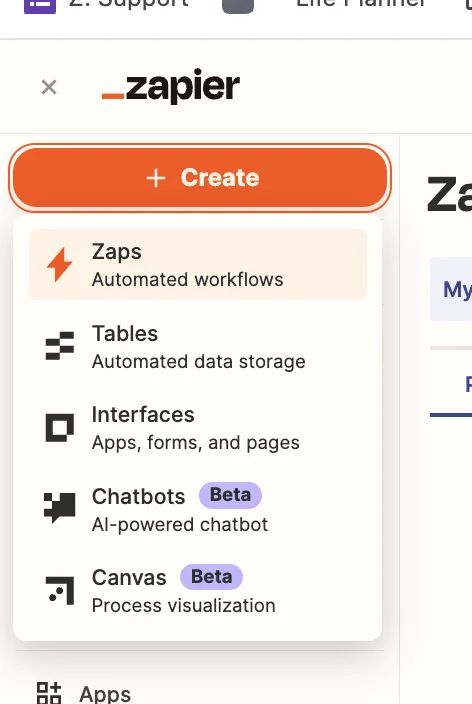
Next, head over to Zapier, then in the dashboard, in the top left, click the big orange “Create” button and select ‘Zaps’.
Inside the zap editor, click on the box that says “Trigger” and select/search for ‘Airtable’ as the app. Then select ‘New Record’ as the trigger event.
Configure the step by selecting the base, table and view you just created in Airtable.
Records will only appear in this view when you change the status field to “Go”. Make sure you only do that once you’ve filled in the other required columns.
Test the zap step and you’ll see the article loaded in.

Step 2: Use the OpenAI API to find suitable anchor phrases in the post
The next step is to find some suitable anchor phrases in our post. We’ll then turn these into external links.
To do this we’ll use the OpenAI API.
Add a new action step to your zap, with “ChatGPT” as the app and ‘Conversation’ as the action event.
When configuring the step, these are the important fields.
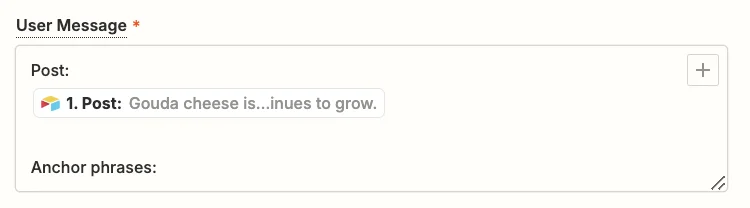
- User message
Use the following text and map the ‘Post’ value from the trigger.
Post:
{{1.Post}}
Anchor phrases:
- Model
Select the “gpt-4o-mini” model, OpenAI’s cheapest and quickest model.

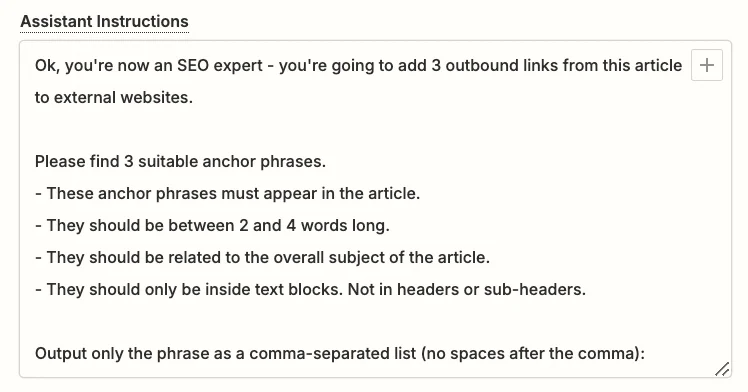
- Assistant Instructions
You can experiment here to get exactly what you want, but this prompt should work well:
Ok, you're now an SEO expert - you're going to add 3 outbound links from this article to external websites.
Please find 3 suitable anchor phrases.
1. They should be between 2 and 4 words long.
2. They should be related to the overall subject of the article.
3. They should only be inside text blocks. Not in headers or sub-headers.
Output only the phrase as a comma-separated list (no spaces after the comma):
Go ahead and test the step, then scroll down towards the end of the “Data out” tab, and you’ll see the response generated by ChatGPT.

Now we need to separate the content into individual phrases.
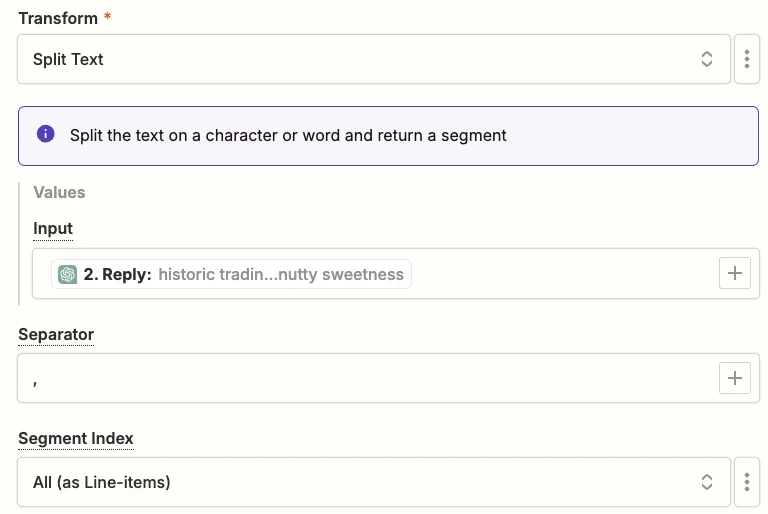
Add a new action step to your zap with ‘Formatter by Zapier’ as the app and ‘Text’ as the action event.
Configure the step as follows.
- Transform
Select “Split Text”.
- Input
Map the ‘Reply’ value from the ChatGPT step.
- Separator
Type in a comma.
- Segment Index
Select “All (as Line-Items)”.
Test the zap step and you’ll see our anchor phrases split out.

The final step before we search for some links is to add a loop to the Zap, so that each phrase is processed separately.
Add a new action step to your zap with ‘Looping by Zapier’ as the app and ‘Create Loop From Line Items’ as the action event.
When configuring the step, under “Values to Loop” you should add one item. In the left column type ‘phrase’ and in the right column map the ‘Output’ value from the formatter step.

Test the zap step and you’ll see the first phrase loaded into the loop.

Step 3: Use the Brave Search API to find external links for each anchor phrase
Now let’s take each phrase and use the Brave Search API to find a relevant website to link to.
Create an account - their free plan allows 2,000 searches per month - and create an API key on the “API Keys” page.
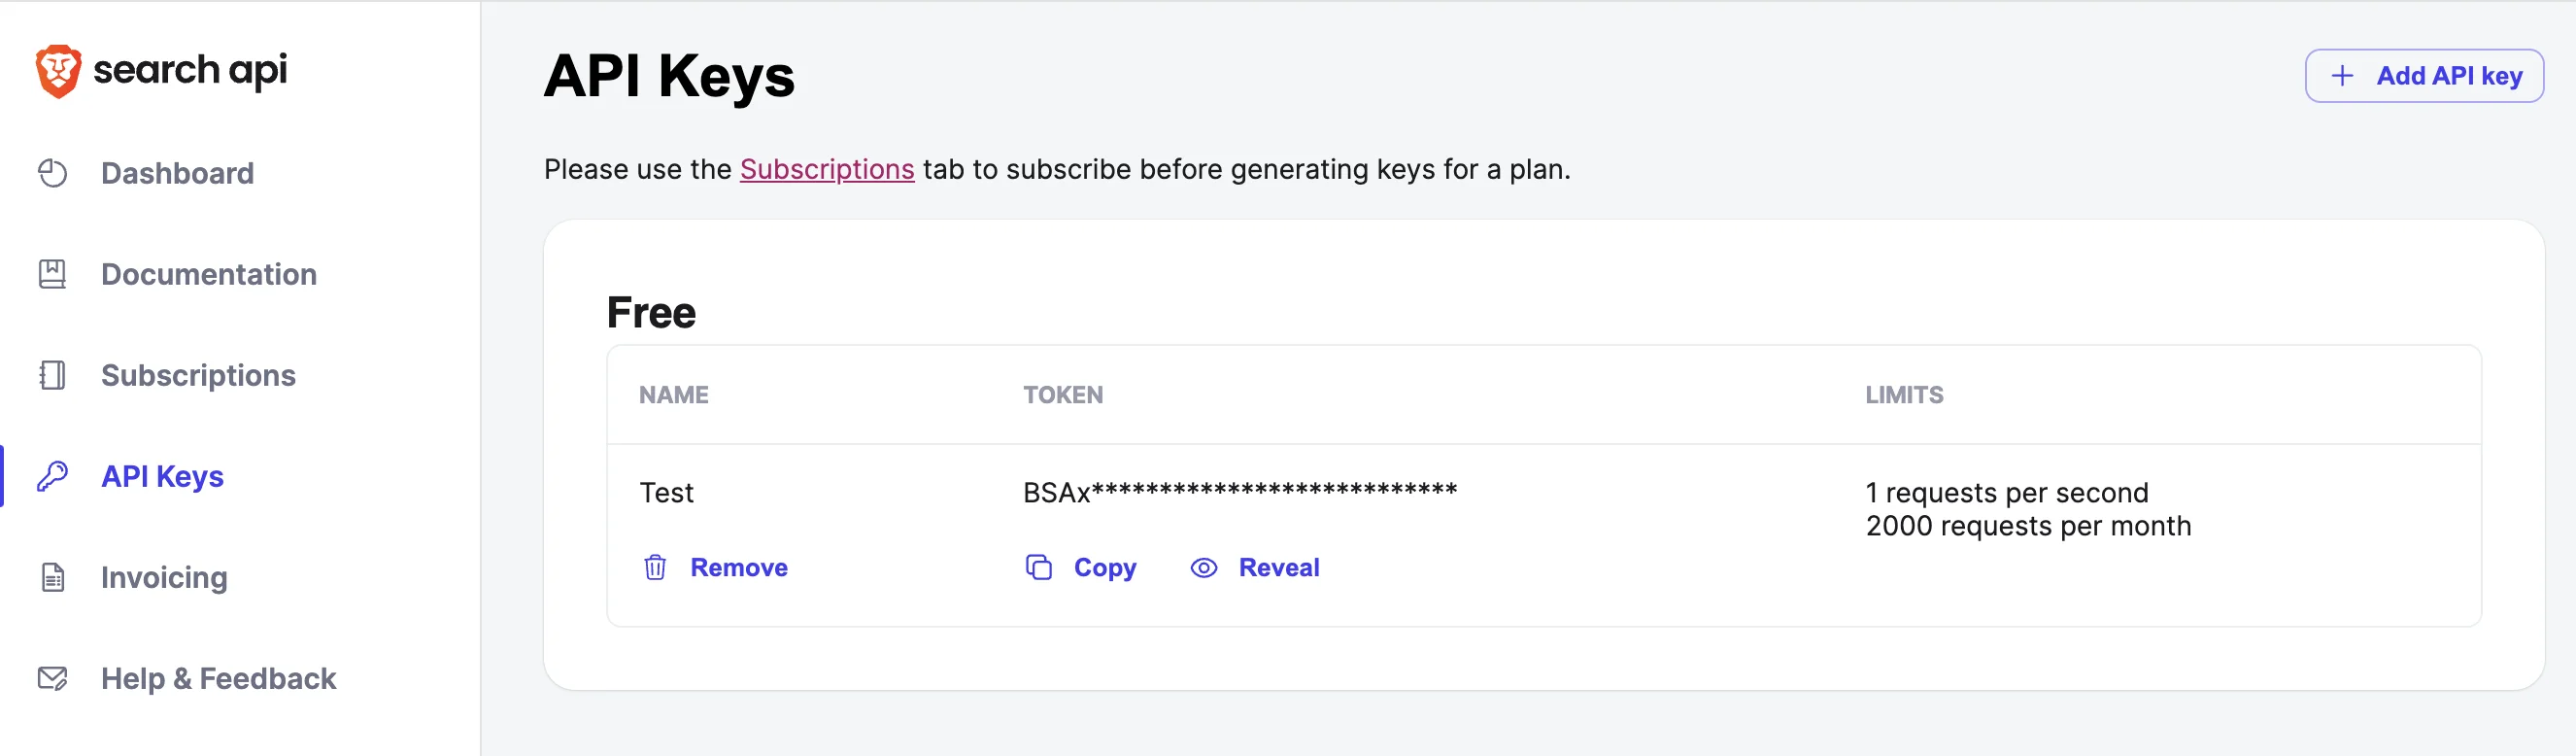
Add a new action step to your zap with ‘Webhooks by Zapier’ as the app and ‘GET’ as the action event.
When configuring the step, these are the important fields.
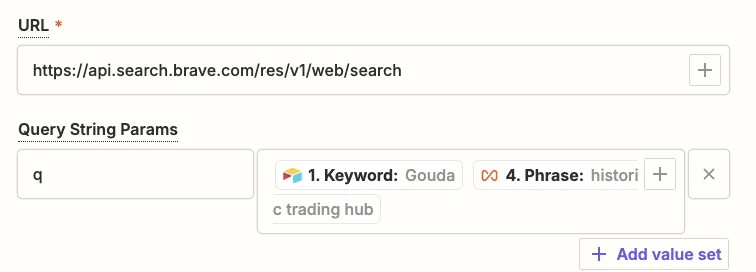
- URL
Use the URL “
https://api.search.brave.com/res/v1/web/search”.
- Query String Params
Add one item here. In the left column type “q” and in the right column map the ‘Keyword’ value from the trigger and the ‘Phrase’ value from the loop step, with a space between them.
- Headers
Add one item here. In the left column type “X-Subscription-Token” and in the right column paste in your API key/token from Brave.

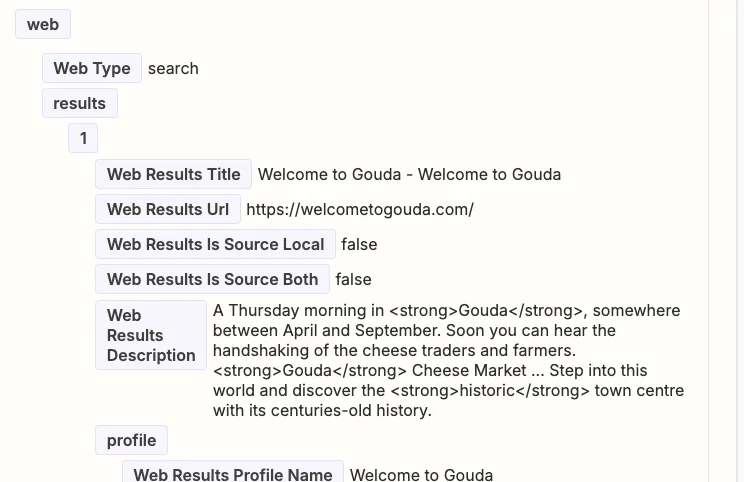
Test the zap step and in the “Data out” tab, if you scroll down a bit, you’ll see the retrieved search results.
Step 4: Update the post in Airtable
It’s not always the top search result that’s the best to use, so what we’ll do is have Zapier select one of the top 10 links at random to link in our article.
Add a new action step to your zap with ‘Formatter by Zapier’ as the app and ‘Utilities’ as the action event.
Configure the step as follows.
- Transform
Select “Pick from list”.
- Operation
Select “Choose Random”.
- Input
Add one item here, mapping the ‘Web Results Url’ value from the webhook step.

Test the zap and you’ll see one of the URLs in the output.

We’re finally ready to update our post in Airtable.
To do that, we need to find the anchor phrase in the article text, and then replace that part with a piece of markdown-formatted text that turns the words into a link.
Firstly, let’s create the markdown-formatted text.
Add a new action step to your zap with ‘Formatter by Zapier’ as the app and ‘Text’ as the action event.
Configure the step as follows.
- Transform
Select “Replace”.
- Input
Add one item here, mapping the ‘Post’ value from the trigger step.
- Find
Map the ‘Phrase’ value from the loop step.
- Replace
Map the ‘Phrase’ value from the loop step and the ‘Output’ value from the random URL formatter step with this markdown formatting for a link.

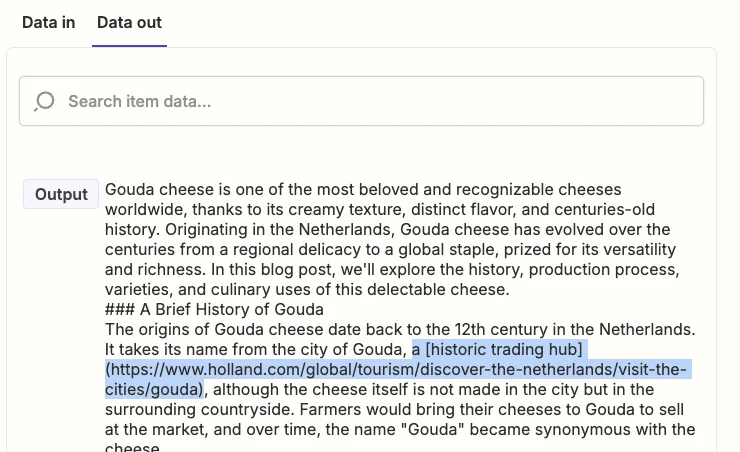
Test the zap step and you’ll see the article copy updated with the markdown-formatted link.
Finally, we need to send the updated article copy back to Airtable.
Add a new step to your zap with “Airtable” as the app and ‘Update Record’ as the action event.
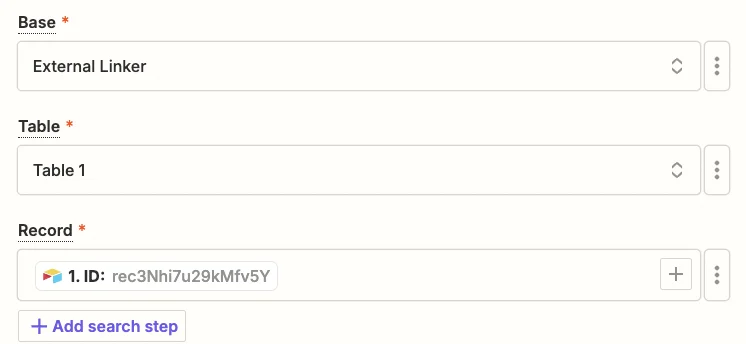
Select the same base and table as you did in the trigger and for the “Record” field, map the ‘ID’ value from the trigger step.
Then in the “Post” field map the ‘Output’ value from the markdown formatter step.

Test the zap, head back to Airtable, and you’ll see the link added to the article.

This tutorial was created by Andrew.